
Loading...
Loading...
Loading...
Loading...
Loading...
Loading...
Loading...
Loading...
Loading...
Loading...
Loading...
Loading...
Loading...
Loading...
Loading...
Loading...
Loading...
Loading...
Loading...
Loading...
Loading...
Loading...
Loading...
Loading...
Loading...
Loading...
Loading...
Loading...
Loading...
Loading...
Loading...
Loading...
Loading...
Loading...
Loading...
Loading...
Loading...
Loading...
Loading...
Loading...
Loading...
Loading...
Loading...
Loading...
Loading...
Loading...
Loading...
Loading...
Loading...
Loading...
Loading...
Loading...
Loading...
Loading...
Loading...
Loading...
Loading...
Loading...
Loading...
Loading...
Loading...
Loading...
Loading...
Loading...
Loading...
Loading...
Loading...
Loading...
Loading...
Loading...
Loading...
Loading...
Loading...
Loading...
Loading...
Loading...
Loading...
Loading...
Loading...
Loading...
Loading...
Loading...
Loading...
Loading...
Loading...
Loading...
Loading...
Loading...
What can payroll admins access on Multiplier platform
A Payroll Admin is responsible for running payroll and has access to all stages of the payroll process, including input, output, and processing. This role is also essential for ensuring timely full and final settlements during employee offboarding.
Responsibilities
Employee Details: View employee departments, gross salary, and fixed allowance details.
Payroll Entries: Access and manage pay supplements, timesheet entries, expenses, and unpaid leaves, and make salary revisions if needed.
Payroll Processing: Run and confirm the payroll for each pay cycle, following the respective cut-off dates.
Payroll Output & Reports: Download Gross to net, headcount, and country-level reports.
Expense Verification: Verify bills and receipts submitted for expense claims by employees, ensuring accurate payroll calculations.
Access
People and Contracts: View sensitive personal and employment information, including full name, compensation, benefits, and contract details.
Payroll: View compensation details, expense claims, receipts, and pay supplement information to process payroll accurately.
Reports: Access reports related to headcount by country, department, and other G2N reports, bank files, and expense reports.
To transfer employees to a new department, add them to the new department. It will automatically remove them from their previous department.
Example: If you want to move three employees from the Research department to the Data Engineering Department, you just need to add them to Data Engineering, and they will be removed from the Research department automatically.
To move an employee to another department, follow the steps in Add employees to a department.
In an organization, a department is a distinct functional or operational unit responsible for carrying out specific tasks, functions, or activities within the organization's overall structure. Departments are typically organized based on the specialization of functions and the need for efficient and coordinated efforts to achieve the organization's goals and objectives.
Departments can include sales, marketing, leadership, engineering, operations, product, human resources, customer success, finance, etc.
Roles and permissions of HR Admins on Multiplier platform
The HR Admin role is critical within the organization, holding almost the same permissions and authority as a Super Admin for all employment and employee information matters. Compared to Super Admins, HR Admins cannot access payroll, billing, and payment functions.
HR Admins have the following access and responsibilities:
Hiring, Onboarding, and Offboarding:
How to add employees to a department in your organization on Multiplier
Learn how to add employees to any department in your organization on the Multiplier platform:
Login to using your credentials.
From the left sidebar, select Settings > Company settings.
What can billing admins access on Multiplier platform.
A billing admin is responsible for managing and overseeing an organization's financial transactions related to billing. This includes viewing and managing sensitive personal and employment information, such as full names, addresses, and professional details. Billing admins are also authorized to pay invoices and access payroll information, including bank account details needed for payment processing. Their role is essential to accurate and timely financial operations.
Billing Admin's access on Multiplier:
View personal and employment information: Billing Admins can view sensitive personally identifiable information (PII) such as full name, address, and professional details.
Pay invoices: Billing Admins can pay invoices received by Multiplier.
A Company Signatory is the person who signs the employment contracts that are generated through the platform. Your Company Signatory could be any of the following team members: COO, CEO, CHRO, HR Manager, Director of the department, etc.
On the Multiplier platform, currently, we support only one Signatory. If you have multiple signatories in your company, you can simply change the Signatory for different contracts when required.
For example, if the Signatory added on Multiplier is the COO of your company, but a certain contract needs to be signed by the CEO, then the Super Admin can change the existing Company Signatory by filling in the details of the CEO and saving it. Once the contract is signed, if you wish to change the Signatory again, you can do so by following the steps below:
Log in to Multiplier using your credentials.
On Multiplier, there’s clearance-based access to data and features. As an employer, you can easily give access to your team based on their role. It helps compartmentalize work so that everyone can focus on their responsibilities.
Role-based access to the Multiplier platform is as follows:
Super admin - Super Admins have complete control over the system, including employee data, time & attendance, payroll, and payments. They can view and manage all employee information, approve time off and payroll, and download reports. They can also assign roles and permissions to other employees and manage organizational settings. Learn more about the .
Payroll admin - The Payroll Admin is responsible for running payroll and overseeing all stages of the payroll process. Their duties include viewing and managing employee details, payroll entries, and payroll processing. They are also responsible for payroll output, reports, and expense verification. They can access sensitive personal and employment information, payroll and expense information, and various reports. Learn more about the
In Multiplier, you can assign approvers or managers to oversee employee workflows such as expenses, time off, and timesheets. This ensures all submissions are reviewed and approved by a manager before they are finalized or included in payroll.
This guide explains when approvers are needed, what they can do, and how to assign them on the platform. Learn how to:
Learn how to create a Multiplier account using your Google, Microsft, or work email.
Sign up with your work email address
Sign up with Google
Sign up with Microsoft
Department Management: Create and assign employees to relevant departments.
Personal Information: View and modify employee personal information, such as name, date of birth, contact details, and address.
Restricted Information: View only age, nationality, and address (no editing permissions).
Financial Information: Create and update employee financial details, such as bank account information. Receive and approve employee-requested changes to financial information.
Employment Details: View employment type and contract status. Modify notice period, contract start/end date, and other employment details.
Note: The HR admin can only add the Employee ID once. Once added, it can only be changed by Multiplier support.
Restricted Viewing: View salary period, frequency of pay, payslips, tax sheets, and stock options (no editing permissions).
Salary Revisions: View and modify salary revisions.
Expense Management: Create and approve/modify expenses on behalf of employees.
Leave Policy Creation: Create leave policies based on country, gender, etc.
Time Off Requests: View basic information (dates, total amount, type, and status) for employee time off requests.
Leave Type & Policy: Create leave policies at entity, gender, and other levels and allocate them flexibly to various departments.
Leave Data: View leave data at the employee and leave type level to gain insights into allocated, approved, and pending leaves for the year.
Time Off Approvals: Approve or deny time off requests (and receive email reminders), including creating requests on behalf of employees.
Report Generation: Download all available reports, including headcount by country, payments summary, leave summary, and expenses and invoices summary.
Department and Employee Management: Create departments and assign employees accordingly.
Leave Policy Creation and Approval: Create and approve leave policies.
Payroll information: Billing Admins can view Multiplier's bank account details, which are required to process payments.
Account Management
Contractors Solutions
Contractor of Record (COR)
Employer of Record (EOR)
Immigration support
Offboard an employee or contractor
Global Payroll
Integration Support
IT Asset Support
Employee Benefit
Payments
Compliance
What can an approver or manager view?
Approvers can only view and act on requests related to:
Expenses
Time off
Timesheets
They cannot access employee profiles or any personal or sensitive information.
Who can assign approvers?
Only users with admin access or appropriate permissions (e.g., HR Admin or Super Admin) can assign approvers.
Where can approvers be added?
Approvers can only be added directly through the Multiplier platform by the Super Admin.
Billing admin - A billing admin is responsible for managing and overseeing an organization's financial transactions related to billing. This includes viewing and managing sensitive personal and employment information, such as full names, addresses, and professional details. Billing admins are authorized to pay invoices and access payroll information, including bank account details needed for payment processing. Learn more about the role and permissions of Billing Admin.
HR admin - The HR Admin role is critical within the organization, holding almost the same permissions and authority as a Super Admin for all employment and employee information matters. Compared to Super Admins, HR Admins cannot access payroll, billing, and payment functions. Learn more about the role and permissions of HR Admins.
From the Company settings window, select Company structure.
From the Company structure window, select Departments.
You can now add employees to a department. Select the Add Employee icon () next to the department you want to add an employee to.
In the dialog box that appears, select the employee(s) you want to add to the department and then select Add.
The selected employees are added to the department, and the employee count is updated for that department.
In the Company settings screen, scroll down and search for Company signatories. Select the delete icon next to the current signatory.
Once deleted, you get options to add details of the new signatory.
Enter the name, title, and email address of the new signatory. Once done, select Add Signatory.
Can I add more than one Signatory on the Multiplier platform?
The Multiplier platform currently supports only one Signatory. If you have multiple signatories in your company, you can change the Signatory for different contracts when required.
Who can change the company signatory?
Super Admin can change the existing Company Signatory.
Go to Multiplier’s signup page.
Enter your details in the fields under First Name, Last Name, Work email address, and create a Password.
Note - Your password must be of at least 8 characters and must contain at least one uppercase, one lowercase letter, and one special character.
Agree to the Terms & Conditions and Privacy Policy.
Select Sign up.
Multiplier sent you an email to the email address you entered. Verify your email address to complete the registration.
Go to Multiplier’s signup page.
Select Sign up with Google.
You can use the Google account you are currently logged in from or another account.
You get two options:
If you select the current account you are logged in with, agree to the terms and select Continue.
If you select Use another account, enter the email address, then enter your password, agree to the terms, and select Continue.
Go to Multiplier’s signup page.
Select Sign up with Microsoft.
Enter your Microsoft account email address, phone number, or Skype account details and select Next.
Enter your password and select Sign in.
You are now signed in to Multiplier using your Microsoft account.
How to create departments for my organization on Multiplier platform
Super Admins and HR Admins can create departments on the Multiplier platform.
Learn how to create and edit departments for your organization on Multiplier:
Login to Multiplier using your credentials.
From the left sidebar, select Settings > Company settings.
From the Company settings screen, select Company structure.
From the Company structure screen, select Departments.
Select Create new department.
Enter the Department name.
(Optional) - You can add a Description.
(Optional) - You can also assign a Head of the department. Select Assign, choose a person from your organization, and then select Add.
Once you’ve added all the information, select Confirm. The department is created.
Multiplier allows you to edit the custom fields you created. Learn how to edit custom fields:
Log in to Multiplier using your credentials.
From the left sidebar, select Settings > Company settings.
In the company settings window, select Custom fields.
As the custom fields window opens, select next to the custom field you wish to edit.
Make the edits you want and then select Save custom field.
Note: You cannot edit the field type.
The edits are saved.
Restructure your organization quickly on Multiplier. You can edit a department’s name description, assign a new head, and delete a department from your organization on the Multiplier platform.
Learn how to:
Edit a department in your organization
Delete a department from your organization
Login to using your credentials.
From the left sidebar, select Settings > Company settings.
From the Company settings window, select Company structure.
From the Company structure window, select Departments.
Select the ellipsis iconnext to the department you wish to edit and then select Edit department.
You can edit the Department name and description and assign a new head of department by removing the current person.
Once done, select Confirm.
Login to using your credentials.
From the left sidebar, select Settings > Company settings.
From the Company settings window, select Company structure.
From the Company structure window, select Departments.
Select the ellipsis iconnext to the department you wish to edit, then select Delete department.
To ensure that your Multiplier account is secure, you can configure Okta SSO:
Log in to the Multiplier platform using your credentials.
From the left sidebar, select Settings > Company settings.
From the Company settings screen, select Login & authentication.
From the Login & authentication screen, select Get started under Setup Single Sign-On (SSO).
Select the SSO provider from the drop-down. Select Okta.
Note: Currently, we support only Okta.
Select the authentication protocol.
Note: Currently we only support SAML.
Please add the following details on the identified provider’s portal (Okta in this case).
SSO URL: The web address your identity provider uses to initiate the login process and connect to our system via SAML.
Service Provider Entity ID: A unique identifier for our system (the service provider) that your Identity Provider uses to recognize and communicate with us.
Select download next to Encryption certificate and Signing certificate and upload them on your identity provider’s portal.
Please select the automated method (Metadata URL) as the recommended selection. Enter Metadata URL.
Metadata URL: It is a link provided by Identity Provider (like Okta, Azure AD, etc.) that contains all the necessary SAML configuration details like certificates, endpoints, and Entity ID in XML format. It automates setting up the connection between your system and ours.
Select Continue after checking all details.
If the authentication is successful, you see the message and screen as shown here:
Customers can enable SSO for the company employees by enabling the toggle. Disabling it will remove the access to the SSO.
What can super admins access on Multiplier platform
Super Admins hold the highest level of access and control within the system. They have comprehensive end-to-end management capabilities encompassing all settings and functionalities.
Super Admins have extensive control over employee employment information.
Manage People and Contracts: View and manage all payroll and employment information. Act as the sole signatory for employment-related documents and contracts. Add and manage IT equipment, stock options, and benefits.
Access Employee Data: Access and view profile data, legal documentation, identification details, emergency contact information, and prior education and employment details (tenure, designation, salary).
Super Admins manage time and attendance policies and approvals.
Create Leave Policies: Create policies based on country, gender, and other criteria.
View Time Off Requests: View employee time off requests with details, including dates, total amount, time off type, and status.
Manage Leave Types & Policies: Create and allocate leave policies at entity and gender levels to various departments.
View Leave Data: View data at the employee and leave type level, including allocated, approved, and pending leaves.
Super Admins have complete access and control over payroll and payments.
View & Download Confidential Information: View all payroll information, including compensation details. Download payslips, reports, invoices, and receipts.
Adjust Payroll and Payment Items: Add and edit payment items, such as expenses, bonuses, and milestones.
Approve Payroll and Payment Items: Approve additional payment items, including expenses, bonuses, and paid time-off requests.
Submit Payroll Report:
Super admins have view-only access to salary information.
View Salary Information: View salary period, frequency of pay, and stock options provided to employees. Cannot edit or make changes to this data.
Super admins can access and download all reports.
Download Reports: Download all available reports, such as headcount by country, payments summary, leave summary, expenses, and invoices summary.
Super admins manage organizational settings.
Assign Roles & Permissions: Assign roles and permissions to other employees and add billing contacts and signatories.
Assign Manager Permissions: Assign permissions to managers for approvals of time offs, timesheets (attendance), and expenses.
Manage Departments: Create and assign employees to relevant departments.
Approve Time Offs: Approve time offs, send reminders, and create time off requests for employees.
Create, Approve, and Deny Time Off Requests: Full control over time off requests.
Pay Invoices: Pay invoices for employees and contractors.


Multiplier allows you to create custom fields if you require additional information from new hires. Learn how to create custom fields:
Log in to Multiplier using your credentials.
From the left sidebar, select Settings > Company settings.
Multiplier’s platform offers the feature to revise the contract of an employee who hasn’t joined yet. Once you update the start date, the old contract is revoked, and a new contract is created with the updates. The new contract is then sent for signature. Ensure that you inform the employee about the same, as the change in start date affects the onboarding process. Learn how to update the start date for an employee:
Log in to Multiplier using your credentials.
From the left sidebar, select Team.
Log in to Multiplier using your credentials.
From the left sidebar, select Settings > Company Settings.
Select Assign Managers.
You can update compensation details, designations, additional pay components, and generate an addendum for the COR contractor directly using the Multiplier platform. Learn how to revise compensation and designation for COR Contractors:
Log in to Multiplier using your credentials.
From the left sidebar, select Administration > Compensation revision. The Compensation & Designation revision window opens.
Learn how to set up ACH Auto Debit for Contractors on Multiplier
You can initiate auto-debit for contractor invoices within 1 and 5 days of approval.
Example: If you set a preference of 3 days, the auto-debit will be initiated 3 days after you approve the contractor invoice. Once the payment is received, the contractor will be paid immediately. If no preference is set, the default schedule will be 2 days post-approval.
Login to using your credentials.
From the left sidebar, select Settings > Company Settings.
Enhanced control and visibility over contractor payouts through the downloadable contractor bulk invoice report. Learn how to download:
Log in to Multiplier using your credentials.
From the left sidebar, select Administration > Contractor invoices.
EOR employees in select countries can submit their resignations directly through the Multiplier platform. You can view the complete list of eligible countries
Learn how to .
Funding Multiplier to process payroll will be in line with the payroll calendar.
Multiplier will share the draft payroll by around the 16th of the month, which you need to confirm by the 20th.
You will receive the funding invoice by the 22nd of the month, including the amount and the account details into which you need to fund the invoice.
Multiplier will require the funds within 3 days to ensure employees are paid on time and by the end of each month. Depending on whether you’ve chosen for only Gross to Net (G2N) calculations or G2N and salary disbursements, here’s how you can fund Multiplier to process your company’s global payroll.
For Gross to Net services, the multiplier will raise an invoice you pay via bank transfer or direct debit (if you are based in the US).
For Salary disbursements - You can fund Multiplier in 2 ways:
Central funding - You can pay Multiplier in a single currency, which will be disbursed for salary payments to your employees in the respective currencies required. In this case, foreign exchange rates will apply.
Local funding - You can locally fund Multiplier for salary payments in the respective currencies based on different entities of your business, and we will disburse the salaries to employees. In this case, no foreign exchange rates will apply.

As the custom fields window opens, select Add custom field. You can create custom fields for members.
In the New custom field in the member window, under Briefly describe this field, enter the field name and use the Type dropdown to select the field type. Types of fields available:
Short Answer
Long Answer
Number
Date
Single Select
Multi Select
Web Link
Document
Once you select the field type, you are required to enter the example text inside the field.
Under the field behaviour, enable the toggles you require. For example, if you want the field type to be mandatory, enable the toggle next to Mark this field as required.
In the Where will this field appear section, use the Section and Sub section drop-downs to select where you want to place the field.
Under Who is this field applicable to, select the type of employee/contractor for whom you want this field to apply. Switch the toggle to enable the field.
Once you enable the toggle, you get options to select the country where you want the field to be applicable. You can either select a country or make the field applicable to all countries.
Select the personnel to whom this field is accessible. You can select the type of access.
Once done, select Save custom field. The custom field is created.
If you have created a custom field to request additional personal details for any employee or contractor, for example, their favorite color, the custom field will be located in the Personal Details section of the employee/contractor’s Multiplier account. Using the example of this custom field, learn how a custom field is used:
Login to Multiplier using your credentials.
From the left sidebar, select Team.
Select the Active tab.
Select the employee/contractor for whom you wish to access and use the custom field.
Since we did not select any specific subsection for the custom field, the custom filed can be found in the others section.

In the Team overview screen, select the Onboarding tab.
In the onboarding tab, select the employee for whom you wish to revise the contract.
To edit the start date, select Revise contract.
In the dialog box that appears, select Revise contract.
The contract is ready to be revised. Select Edit contract.
In the Edit Contract dialog box, edit the contract as required and then select Create New Contract.
Select Save Changes and Create New Contract.
The contract has been revised. Select Send Contract to send the revised contract.

Select the approver you wish to remove.
Select (delete) next to Edit Approver.
In the Remove Approver box that appears, select Continue.
The approver has been removed successfully.

Use the search bar to find the team member.
Scroll down to the Compensation & Designation section. Update the Revised hourly pay amount.
Enter the New Designation.
Select the effective date.
You can also make changes to the additional pay.
Once done, select Continue.
You can review the addendum by selecting. Once done, select Confirm & Send Addendum.
The addendum is sent to the COR Contractor for signature.
Once the COR Contractor signs it, the compensation will be effective from the effective date selected by you.
Note: Until the contractor signs it, it will be visible under the Pending tab in the Compensation & Designation Revision section. Admins can also edit it. Once the contractor signs, it will be available under the Complete tab.

From the Company settings window, select Payment settings.
Under Additional settings, select the execution day of auto-debit from the drop-down list.
2. Read the details and then select Yes, update.
The execution date is now updated:
After approving contractor invoices, you will receive an email notification about the scheduled payment based on their selected preference.
On the execution date, the auto-debit process will be initiated automatically.
Note: The auto-debit email notification will be sent only once by the end of the approval date, consolidating all payments approved during the day.
In the Download Invoice Report dialog box, under Filter by, choose a filter type:
Invoice Status
Invoice Date
Contractor Country
Payable type
Based on your selected filter, define the filter value using the Equals dropdown:
For Invoice Status: Choose from Pending, Approved, Processing, or Rejected.
For Contractor Country: Choose a country from the list.
For Invoice Date: Select a Start Date and End Date.
For Payable type: Select from Expense, Invoice, and Pay supplement.
Note: You can add more filters by selecting the + Add New filter.
Once done, select Download to download the report.
Enable automatic invoices for contractors
How to onboard a Contractor?
Frequently asked questions about Multiplier's COR solution
Multiplier’s platform offers you the feature to update the joining date of an employee even after the contract has been sent for signature. Once you update the start date, the old contract is revoked, and a new contract is created with the updated start date. The new contract is then sent for signature. Ensure that you inform the employee about the same, as the change in start date affects the onboarding process. Learn how to update the start date for an employee:
Log in to Multiplier using your credentials.
From the left sidebar, select Team.
In the Team overview screen, select the Onboarding tab.
In the onboarding tab, select the employee for whom you wish to update the start date.
To edit the start date, select Edit Employee Start Date.
Select Continue to Edit Contract.
In the Edit contract dialog box, use the Employee Start date dropdown and select the new start date for the employee
Once selected, select Create New Contract.
Select Save Changes and Create New Contract.
The start date is updated, and the previous contract has been revoked.
You can review the updated contract by selecting Review contract.
Log in to Multiplier using your credentials.
From the left sidebar, select Payroll.
In the payroll dashboard, select Global Payroll.
Hover over the Completed icon in the Progress column. The icon changes to Download. Select Download G2N report.
The payroll report section opens. Select Download all to download all the available reports. You can also download individual reports by selecting the download icon next to the reports you wish to download.
Learn how to access contractor payment reports an as admin
Generate and download a consolidated report of all payments made to contractors from Multiplier. You can generate detailed reports on invoices, expenses, pay supplements, and management fees paid to contractors over a specific period.
With this feature, you can:
Filter payments by contractor type, payment date, payable type, approval date, contractor name, etc.
Reconcile expenses with your company’s bank statements.
Download reports in CSV and PDF formats for financial reporting and compliance needs.
To access reports:
Log in to using your credentials.
From the left sidebar, select Reports.
From the Reports window, select Contractor payout summary report.
In the Contractor payment summary dialog box, select the filter for which you wish to download the report. You can keep adding filters by selecting Add new filter.
Note: You can add filters such as payment type, date of approval, date of payout, contractor type, contractor name, etc.
Once you have added all the filters, select Download report.
Note: The report is sent to your email.
Learn how to raise invoices for pay-as-you-go contractors from approved timesheets
If you miss creating the invoice while approving the timesheet, you can raise it by following the steps given here:
1. Go to Multiplier’s client login and sign in with your User ID and password.
2. From the left panel, select Administration and then choose Timesheets.
3. From the Timesheets window on the right, select the Employee type drop-down option and choose Contractors.
4. Select the contractor you need to approve the timesheet and raise the invoice.
5. Select the Approved tab, then select Create invoice next to the timesheet for which you wish to raise the invoice.
6. From the dialog box that appears, select Create Invoice.
7. From the window that appears, select Create Invoice from the upper right.
8. The invoice gets created, and you can view it by selecting View Invoice from the upper right.
Log in to Multiplier using your credentials.
From the left sidebar, select Payroll.
In the payroll dashboard, select Global Payroll.
4. Select Publish Payslips. In the screen that opens, select Publish all from the lower right.
5. In the Send payslips to all employees dialog box, select Send payslips.
Employees or contractors may need to be offboarded for various reasons, including resignation and termination. Learn how to offboard an employee or contractor who is terminated:
Login to Multiplier using your credentials.
From the left sidebar, select Team.
In the Team overview screen, select Offboarding.
Hover over the ellipsis icon next to the candidate for whom you want to reschedule the offboarding and then select Reschedule offboarding.
Enter the new last working day. Upload supporting documents and acknowledge that you have discussed the new last working day with the employee.
Select the checkbox next to I agree, that the above-mentioned date has been discussed with the employee and they consent on the last working day.
Select Initiate offboarding. The new last working day will be updated after our team verifies the details you provided.

If your team structure or responsibilities change, you can easily edit, reassign, or remove approvers.
Log in to Multiplier using your credentials.
From the left sidebar, select Settings > Company Settings.
Select Assign Managers.
From time to time, you may need to change the designation, compensation, or both for employees and contractors. Learn how Multiplier helps you with this:
Log in to Multiplier using your credentials.
From the left sidebar, select Administration > Compensation revision.
Payroll cut-off dates at Multiplier
At Multiplier, we use payroll cut-off dates to finalize salary payments, salary revisions, bonuses, allowances, pay supplements, and expense reimbursements. These deadlines ensure payments are processed and disbursed within the correct payroll cycle.
To avoid payment delays, onboarding employees on time and submitting or approving any additional payments before the payroll cut-off date is crucial.
Learn how to view your employees’ payslips on Multiplier:
Learn how to view your employees’ payslips on Multiplier:
Login to using your credentials
From the left sidebar, select Team.
From the Team overview screen, select the Active tab.
You can now equip employees with laptops and IT assets directly from the platform:
Login to using your credentials.
From the left sidebar, select Team and then select the Active tab.
How to check the IT assets available in a specific country
Login to using your credentials.
From the left sidebar, select .
From the Resources section, select IT assets.
Multiplier's global payroll solution helps businesses manage payroll across 100+ countries from a single interface. It automates complex tasks such as multi-country tax calculations, benefits administration, compliance with local labor laws, and multi-currency salary disbursement.
The solution simplifies global payroll by unifying payroll operations under one platform, eliminating the need for multiple vendors and fragmented processes.
Learn how to view and approve payroll:
Log in to Multiplier using your credentials.
From the left sidebar, select Payroll.
Login to using your credentials.
From the left sidebar, select Team.
In the Team overview screen, select Offboarding.
Transfers to countries like Russia or the Maldives may take up to 10 business days due to local partners
Employees onboarded before the 15th will receive their salary and payments within the same month.
Employees onboarded after the 15th will receive their salary and payments in the following month.
When onboarding a new employee, you will be notified of the applicable payroll cut-off date based on their Employment Start Date.
The 15th of the month cut-off date also applies to:
Salary revisions
Bonuses
Allowances
Pay supplements
Expense reimbursements
For any of these payments to be processed within the same month’s payroll, they must be submitted and approved before the cut-off date.
Due to local labor laws and infrastructure constraints, the payroll cut-off date for employees in Japan and Pakistan is the 10th of every month instead of the 15th.
For employees on a semi-monthly pay cycle, different payroll cut-off dates apply:
1st Pay Cycle (1st – 15th): The cut-off date is the last day of the previous month.
2nd Pay Cycle (16th – 31st): Cut-off date is the 15th of the current month.
Example: If an employee is onboarded or additional payments (such as bonuses or allowances) are added after the specified cut-off date for a particular pay cycle, the salary and payments will be processed in the next payroll cycle.
This structured approach ensures that all payroll processes remain seamless, timely, and compliant across different regions and pay cycles.
Avail an intuitive platform where contractors can raise invoices easily & send them for your approval.
Rely on our exceptional support team, available 24/5 to help you with all the necessary information.
Hire great talent compliantly without being restrained from hiring in just your home country.
Here's an overview of what Multiplier’s Global Payroll offers:
Enjoy the convenience of managing payroll across 100+ countries through a single interface.
Seamless integration capabilities with leading Global HRIS Platforms like Workday, BambooHR, SAP SuccessFactors, OracleHCM, Hibob, Personio, and more.
Benefit from Global Visibility and Reporting Capabilities, providing insights into your payroll operations worldwide.
Access local payroll experts in countries where we process payroll, ensuring compliance with local regulations.
Receive support in local languages whenever required, enhancing communication and understanding.
Be assigned a dedicated customer success manager, ensuring month-on-month operations are smooth and tailored to your needs.
Centralize payroll funds and disburse payments globally in various currencies, maintaining compliance with local regulations.
Integrate our Payroll product with other HR software to eliminate manual data entry, reduce administrative overhead, and save valuable time and resources.
Ensure compliance with tax regulations and labor laws through our Payroll product, minimizing the risk of penalties and audits.
Prompt and accurate payroll processing directly contributes to employee satisfaction.
Our Payroll product ensures timely and correct payment disbursements, instilling employee trust and confidence and minimizing overall risk exposure.
In essence, Multiplier’s Global Payroll offers a holistic and streamlined approach, combining global reach with local expertise to provide a reliable, compliant, and efficient payroll solution that allows you to focus on scaling your business without compromising legal compliance or employee satisfaction. If you'd like to understand our offerings in further detail, please download this e-book detailing our offerings and product capabilities.
The implementation process typically spans 45-60 days, contingent upon factors such as the number of employees and entities involved. The steps in this meticulous process include:
Sharing the complete set of data requirements
Defining payroll setup activities, including how the payroll data will be received and sent
Payroll calendar finalization
Includes setup of templates meant for information gathering
Creation of company and employee master data repository
Country service document session objectives
Authorization to your bank to make payroll payments on their behalf
Upload year-to-date data for earnings, deductions, and tax
Proposed solution and payroll process overview
During the demo, our account executives and implementation managers will conduct a simulation payroll run with you. You will be given a complete understanding of the country's payroll as per your choice. You can view stages of the Payroll cycle along with reporting capabilities, including Payroll, Payment, statutory & compliance reports.


Go to Multiplier’s client login and sign in with your User ID and password.
From the left panel, select Administration and then choose Timesheets.
From the Timesheets window on the right, select the Employee type drop-down option and choose Contractors.
Select the contractor for whom you need to approve the timesheet or wish to request a change in the timesheet.
Select the Pending tab, then select the timesheet you want to approve.
If you wish to approve the timesheet, select Approve from the upper right.
Go to Multiplier’s Client login and sign in with your User ID and password.
From the left panel, select Administration and then choose Timesheets.
From the Timesheets window on the right, select the Employee type drop-down option and choose Contractors.
Select the contractor you need to approve the timesheet or wish to request a change in the timesheet.
Select the Pending tab and select the timesheet to which you want to approve or request changes.
If you wish to request a change in the timesheet, select Request Change. A dialog box appears, asking you to describe the changes you need.
Once you enter the information, select Submit Request.
Select the approver you wish to edit
Select Edit.
Select the new employee(s) who want to be assigned to the approver. You can also unselect the employees you wish to remove.
Once done, select Assign. The employees under the approver have been updated successfully.

Use the drop-down under Team Member to select the contractor for whom you wish to revise the compensation or designation.
To revise compensation, enter the new amount in the field box under Revised monthly pay amount.
To revise the designation, enter the new designation under the New Designation field box.
Scroll down and select the effective date of change.
(Optional) Add any additional pay if you want. Select Add Additional pay. In the dialog box that appears, enter the details as asked and select Add.
Select Continue.
Review the details entered by you and select Confirm revision.
Once you select Confirm revision, the compensation revision and designation change are updated and will reflect from the effective date you selected.

Select the employee whose payslip you want to view. Employment details of the selected employee opens.
Select the Payslips tab.
From here, you can either view or download the PDF:
To view the payslip, select View next to the payslip you want to view.
To download the payslip, select Download PDF next to the payslip you want to download.
Select the IT assets tab at the top of the screen.
6. Browse through the catalog of available IT assets.
Note: IT asset availability may change across different countries. Learn how to check IT asset availability in a specific country.
7. Select the required asset and then select Submit request.
You can also select More details for information on the asset’s specifications.
Upon submitting your request, you see a confirmation message.
8. Upon confirmation of the order, you will receive an invoice in your email and are requested to pay to Multiplier.
9. Once the payment is confirmed, the Multiplier team will contact you to obtain the employee’s contact information.
11. All the requested IT assets will be dispatched to the employee
12 The employee will be asked to sign an Equipment agreement with all the relevant clauses.
13. Once the agreement is signed, the assets will be mapped to the employee on the Multiplier platform.
Note: You can view the mapped assets by selecting the Assets section on the sidebar.
If you want to request something that is not in the catalog:
Select Can’t find what you are looking for?
Enter your requirements and select Submit Request.
Log in to Multiplier’s platform. From the left sidebar, select Administration > Contractor invoices.
Select the Pending tab and select the contractor invoices you want to approve.
Select Approve to approve the selected invoices.
Note: The approved invoices will appear under the Approved tab. You can then proceed with payment by clicking on Proceed to pay.
In case you want to reject an invoice, follow the steps here:
Log in to Multiplier’s portal. From the left sidebar, select Administration > Contractor invoices.
Select the Pending tab and select the contractor invoices you want to reject.
Select Reject to reject the selected invoices.
Select the reason for rejection and add additional comments. Both of these are mandatory fields. Your entries here are communicated to the contractor as the reason for the rejection of the invoice.
The invoices can be in the following statuses:
Approval-pending - The invoices pending approval will be available here. You can edit, revoke, or download your invoices from here.
Approved - The invoices that are approved but still not processed for payment can be found here.
Pending Payment - Invoices that have been processed for payment but the payment has still not reached your account can be found here.
Paid - Invoices that have been paid can be found here.
Rejected - You can view all the rejected invoices in this tab.
From the IT assets screen, select a country.
If your selected country is serviceable, you'll see a list of available assets. You can choose from the list or refine your options using the Asset Type and Brand filters.
Note: If you don't find the model as required, write to us at [email protected]
Go to Multiplier’s client login and sign in with your User ID and password.
From the left panel, select Administration and then choose Timesheets.
From the Timesheets window on the right, select the employee type from the Employee type dropdown.
Select the employee for whom you need to approve the timesheet or wish to request a change in the timesheet.
Select the Pending tab, then select the timesheet you want to approve.
If you wish to approve the timesheet, select Approve from the upper right.
In the Approve Timesheet dialog box, select Approve.
The timesheet is approved.
Go to Multiplier’s Client login and sign in with your User ID and password.
From the left panel, select Administration and then choose Timesheets.
From the Timesheets window on the right, select the employee type from the Employee type drop-down option.
Select the contractor for whom you want to request a change in the timesheet.
Select the Pending tab and select the timesheet to which you want to request changes.
If you wish to request a change in the timesheet, select Request Change. A dialog box appears, asking you to describe the changes you need.
Once you enter the information, select Submit Request.
In the Payroll dashboard, select the Global Payroll tab.
You see a list of payrolls. Under the progress column, you also see the progress of each payroll:
Hover over the ellipsis icon next to the candidate for whom you want to reschedule the offboarding and then select Cancel offboarding.
From the dialog box that appears, select Yes, Cancel.
Once cancelled, the employee or contractor moves to the Active tab in the Team section.


Learn how to assign roles on Multiplier.
Your employees can be assigned roles on Multiplier, giving them additional access to perform actions on the platform.
Learn how to:
Log in to using your credentials.
From the left sidebar, select Settings > Company settings.
In the Company settings screen, scroll down and select Roles and permissions.
Select the role you wish to assign. You get four options:
Super Admin
Payroll Admin
Billing Admin
HR Admin
Learn more about each role from .
After selecting the role you wish to assign, the respective screen opens. Select Assign a role.
Select Edit under Role coverage to choose the employees you wish to manage under this role.
To manage the employees covered under this role, you have two options:
Select all the employees of your organization: If you wish to select all the employees of your company, select the checkbox next to Select all employees of your company.
Select specific employees of your organization: If you wish to select specific employees, click on Select. Then, choose the department for which you want to assign the role. Then select Apply, and then select Add.
Click on Select under Assign role.
In the Assign role dialog box, select the person you wish to assign the role to and then select Assign from the lower right.
Note: You can also invite a new user using the Company users tab in the Assign role dialog box.
Select Save changes from the lower right.
The person you selected has now been assigned the role.
Log in to using your credentials.
From the left sidebar, select Settings > Company settings.
In the Company settings screen, scroll down and select Roles and permissions.
Select the ellipsis iconnext to the person you wish to edit the role for. Then select Edit coverage.
Select Edit under Role coverage to choose the employees you wish to manage under this role.
To manage the employees covered under this role, you have two options:
Select all the employees of your organization: If you wish to select all the employees of your company, select the checkbox next to Select all employees of your company.
Select specific employees of your organization: If you wish to edit specific employees, click on Edit. Then, choose the department for which you want to assign the role. Then select Apply, and then select Add.
Select Update from the lower right.
The role assigned is updated.
To remove an employee from a role:
Log in to using your credentials.
From the left sidebar, select Settings > Company settings.
In the Company settings screen, scroll down and select Roles and permissions.
Select the ellipsis iconnext to the person you wish to edit the role for. Then select Delete Role.
In the dialog box that appears, select Confirm.
What do you do if you require a role missing from the list of roles available on the platform?
If you’d like to add a role that is unavailable on the platform, you must reach out to your dedicated CSM with the request. Alternatively, you can mail us at [email protected]
Learn how to offboard a contractor using the Multiplier platform:
Log in to Multiplier using your credentials.
From the left sidebar, select Team.
In the Team overview screen, select the Active tab.
Select the contractor you want to offboard.
When the details for the contractor appear, scroll down to the Additional actions section, and select Start offboarding.
You get two options:
Multiplier smoothly integrates with Workday, centralizing employee information for efficient and accurate payroll management. While Workday offers PECI Integration, Multiplier enhances this process through API integration.
PECI (Payroll Effective Change Interface), introduced by Workday in 2016, sequentially transmits payroll changes for each worker, including effective and data entry dates.
API (Application Programming Interface) enables two-way communication between your system and the payroll system, allowing faster data requests and tailored data synchronization.
Effortless Setup: Supported by Multiplier, requiring no additional development effort.
Faster Data Sync: Supports higher frequency compared to PECI.
Simplified Setup and Security: Easily set up API support in Workday, with security managed by Workday.
Multiplier's API integration with Workday simplifies payroll management by streamlining data exchange, enhancing flexibility, and ensuring data accuracy. This user-friendly approach saves time and effort, allowing you to focus on core business operations.
Frequently asked questions by HRs and Employers about Insurances on Multiplier platform
Access your global payroll reports on Multiplier
Managing payroll efficiently requires clear insights into financial data, compliance, and workforce costs. Multiplier simplifies this process with a suite of payroll reports that provide a comprehensive view of your payroll operations. From tracking employee earnings and deductions to analyzing payroll costs and statutory obligations, our reports help businesses make informed decisions while ensuring compliance with local regulations.
Explore the different types of payroll reports available on Multiplier and better understand your payroll data.
A Gross to Net Report outlines the transition of an employee's earnings from the gross income (total earnings before deductions) to the net income (take-home pay after deductions). This report typically provides a detailed breakdown of various deductions, such as taxes, benefits, and other withholdings.
A Payroll Input Report is a comprehensive record that documents all the relevant data and information used in the payroll processing system. This report includes employee expenses, time-offs, salary revisions, and other pertinent input factors. It is a vital tool for ensuring accuracy in payroll calculations and provides a clear audit trail for the inputs contributing to the final payroll figures.
The Total Payroll Cost Report is a financial summary that outlines the complete cost incurred by an organization for its workforce during a specific period. This report encompasses the basic salaries and includes additional expenses such as employer contributions to benefits, taxes, and other associated costs. It offers a comprehensive view of the overall financial commitment related to the workforce.
A variance report in HR and payroll refers to a comprehensive analysis highlighting the differences in pay components between the current pay cycle and the preceding one. This report meticulously examines changes in salary components, allowances, deductions, and any other relevant factors, providing a detailed insight into the evolution of compensation structures over consecutive pay periods. By discerning these variations, organizations can gain valuable insights into trends, anomalies, and potential areas for optimization in their payroll processes, fostering informed decision-making and continuous improvement in compensation management.
An Employer Summary is a consolidated report that provides an overview of key payroll-related information from the employer's perspective. This report typically includes a summary of total wages paid, employer contributions to taxes and benefits, and other financial aspects associated with the employer's obligations. It is a comprehensive snapshot for employers to assess their payroll-related expenses and compliance with statutory requirements.
An Employee Summary is a concise report offering a snapshot of individual employees' payroll details. It encompasses essential information such as gross earnings, deductions, net pay, and other relevant details specific to each employee. This report is instrumental in providing transparency to employees regarding their compensation and deductions, facilitating clear communication and understanding of the financial aspects of their employment. Additionally, it is a crucial tool for compliance with statutory regulations related to payroll disclosure.
A Payment Instruction File is a digital document or file containing detailed instructions for disbursement of payroll-related funds. This file typically includes information such as employee bank account details, the amount to be paid to each employee, and any specific payment instructions. It is a crucial tool for automating the payroll process and ensures accurate and efficient funds transfer to employees, aligning with their compensation details.
A Bank Summary is a financial report that provides a consolidated overview of transactions related to payroll payments processed through a specific bank account. This report includes details such as total credits (deposits) and debits (withdrawals) associated with payroll transactions. The Bank Summary serves as a reconciliation tool, allowing organizations to cross-reference the payments made in the payroll system with the corresponding transactions in the bank account. This helps verify the accuracy of payroll disbursements and ensures proper financial management.
You can request IT assets while hiring and onboarding new employees:
Login to Multiplier using your credentials.
From the left sidebar, select Hire & Onboard.
Select the employee type.
Select the country & state (wherever applicable).
Enter all required information like Basic Details, Compensation, Insurance, and Compliance.
Select Send Contract for signature.
Once the contract is waiting for signature, you get the option to submit a request to issue IT assets to the new hire. Browse through the catalog of available IT assets.
Note: IT asset availability may change across different countries. Learn how to check IT asset availability in a specific country.
7. Select the required asset and then select Submit request.
You can also select More details for information on the asset’s specifications.
Upon submitting your request, you see a confirmation message.
8. Upon confirmation of the order, you will receive an invoice in your email and are requested to pay to Multiplier.
9. Once the payment is confirmed, the Multiplier team will contact you to obtain the employee’s contact information.
11. All the requested IT assets will be dispatched to the employee
12 The employee will be asked to sign an Equipment agreement with all the relevant clauses.
13. Once the agreement is signed, the assets will be mapped to the employee on the Multiplier platform.
Note: You can view the mapped assets by selecting the Assets section on the sidebar.
Employees in select countries can submit their resignations directly through the Multiplier platform. Here’s the list of such countries:
Australia
India
Mozambique
South Africa
Bangladesh
Isle of Man
Netherlands
South Korea
Barbados
Israel
New Zealand
Sri Lanka
Log in to Multiplier using your credentials.
From the left sidebar, select Settings > Company Settings.
Select Assign Managers. In this section, you can manage approvers for expenses, time off, and timesheets.
To add a new approver, select Approvers > Add an Approver.
Select Add an Approver.
Enter the Full Name and Email Address of the approver.
You can now assign the approver to the team members. Under the Team privileges section, select the required tab from the options given. You get three options:
Expenses
Time Off Requests
Timesheets
Select Add team members.
From the dialog box, select the employees you want to assign to the manager. Select Assign to confirm.
Once you are done adding employees. Select Create Approver.
In the dialog box that appears, select Continue.
Once an approver is assigned:
An invitation email is automatically sent to them to register on the platform (if not already registered)
Approvers receive notifications whenever an employee submits an expense, time off request, or timesheet
They can review and approve submissions directly from their dashboard.

QuickBooks Online is a cloud-based accounting software developed by Intuit, designed to help small and medium-sized businesses manage income, expenses, and financial records efficiently.
Integrating QuickBooks Online with Multiplier allows you to seamlessly sync invoices and expenses, automating manual processes and reducing errors. This integration ensures smooth financial management while scaling your global workforce.
Employees or contractors may need to be offboarded for various reasons, including resignation and termination. Learn how to offboard an employee or contractor who resigned:
Login to using your credentials.
From the left sidebar, select Team.
In the Team overview screen, select Active.
One platform: Consolidate and streamline your payroll operations across multiple countries in one fully compliant platform. This also gives you actionable insights where you identify cost-saving opportunities and align payroll with business goals.
Unparalleled accuracy: We ensure calculations, tax withholdings, and compliance are always right. By minimizing manual processes, we significantly reduce the risk of errors and compliance risks while maximizing trust among employees.
Using the Multiplier platform, you can quickly review payroll, add new employees, manage their benefits, and view payroll reports.
Data Sync
Periodic sync is based on Workday settings; manual sync requires initiation in Workday.
Manual sync can be triggered from the Multiplier platform.
Data Updates
Provides all changes between syncs, potentially including irrelevant information.
Provides only the latest change between syncs, focusing on relevant data.
Communication
One-way: Workday sends a file (XML) to the payroll partner.
Two-way: Enables faster data exchange and requests.
Setup
Requires initial setup, including field selection, sync frequency, and data filters.
Simple setup: Share the API key, and grant permissions within Workday.
Flexibility
Changes require contacting the payroll partner, leading to potential delays.
The payroll vendor handles changes without client intervention.
Data Flow
One-way outbound: Information cannot be sent back to Workday.
Two-way: Data, such as payslips, can be written back to Workday.
Canada
Japan
Nigeria
Taiwan
Cyprus
Kazakhstan
Pakistan
Tanzania
Denmark
Kenya
Philippines
Thailand
Estonia
Laos
Puerto Rico
Uganda
Georgia
Malaysia
Rwanda
United Arab Emirates
Gibraltar
Malta
Saint Lucia
United Kingdom
HongKong
Mauritius
Singapore
United States of America
Hungary
Technology and Infrastructure: Costs for maintaining and upgrading the technological infrastructure needed to manage policies, process claims, and perform other administrative tasks.
Record-Keeping: Expenses related to maintaining accurate and secure records of members and their coverage.
Compliance and Regulatory Costs: Costs associated with ensuring we comply with relevant laws and regulations.


Ensure that the last working day is discussed with the contractor. Select the checkbox next to I agree that the above-mentioned date has been discussed with the employee and they consent on the last working day.
Select Continue.
Select the checkbox to agree to add and approve expenses and pay supplements before the last working day.
Select Initiate offboarding.
Offboarding is initiated, and the contractor will be offboarded once Multiplier verifies all the details.
Enter a note in the Mention the reason for termination field.
Once done, select Continue.
Select the last working day using the Desired Last Working Day dropdown.
(Optional) Upload any supporting documentation.
Select Continue.
Select the checkbox to agree to add and approve expenses and pay supplements before the last working day.
Select Initiate Offboarding.
Offboarding is initiated, and the contractor will be offboarded once Multiplier verifies all the details.


Obtain the GL Template file provided by Multiplier to map invoice line items
Key Notes
The integration setup typically takes 2-3 weeks to implement.
For discrepancies in expense bills or invoices, contact Multiplier support at [email protected]
Stay on top of every invoice:
Automatically sync invoices and expenses between Multiplier and QuickBooks, eliminating missed entries
Automate to eliminate errors:
Map EOR and contractor invoices directly to the correct General Ledger (GL) accounts, saving time and reducing manual mistakes
You can now see the list of all your employees and contractors. Select the person you want to offboard.
Scroll down to the bottom of the selected person’s profile and then select Offboard employee.
Select Resignation as the reason for resignation and then select Continue.
Enter the details in the Offboard Employee - Resignation dialog box. Enter the Desired last working day. Select the date for the employee/contractor as agreed with them.
Upload supporting documents: These documents will help us verify that the employee has agreed with the last working day you have entered. For example, an employee may intimate the manager of resignation via email or internal software/tool. You can attach a copy of the email.
Note - Our team will review the desired last working day per local labor law compliance and get back to you in case the last working day needs to be changed.
Select the checkbox. By checking this box, you agree that you have discussed the specified dates with the employee/contractor and obtained their consent on their last working day.
Select Continue.
Select the checkbox next to I agree to add and approve expenses and pay supplements before the last working day. Then select Initiate Offboarding.
After you initiate the offboarding, the next steps in the offboarding process are as follows:
Confirmation on the last working day to comply with labor laws - Multiplier will validate the supporting documents & the feasibility of the last working day. If the desired last working day does not comply with the country’s labor laws, we may need to adjust the date accordingly. Our team will get in touch with you to finalize the new date.
Email notification for employee’s last working day Once the last working day has been finalized with common consent between the company admin and Multiplier, we will email the employee confirming the last working date and the next steps in the offboarding process.
Full and final settlement (payment) process Multiplier will process the full and final settlement to the employee within 30 days after the last working day.
Exit documents shared via email and dashboard Multiplier will send all the relevant exit documents to the employee via email. These documents will also be downloaded on the employee’s Multiplier platform.
Once offboarded, please note that Multiplier’s lead time will vary depending on when you have offboarded the employee and the employee’s payroll cycle (monthly or semi-monthly).
Resignation of employee who is on monthly payroll cycle
Between 1st to 15th
A lead time of 7 days for offboarding initiation.
Between the 16th and the last day of the month
Our payroll cycle has been closed. Hence, select any date later than or on the last date of the current month.
Resignation of an employee who is on a semi-monthly payroll cycle
Between the 26th of the previous month the 10th of the month
Select any date later than or on the 15th of the next/current month.
Between 11th to 25th of the month
Select any date later than or on the last date of the current month.


Learn how to accept member-initiated resignations:
Learn how to approve timesheets and raise invoices for pay-as-you-contractors
The Timesheet-Based Invoice Generation feature allows managers and admins to generate invoices for hourly and daily rate contractors based on their approved timesheets.
Once a timesheet is approved by the reporting manager or HR/Billing admins, the system uses it as proof of work to create the corresponding invoice. Timesheet-based invoice generation streamlines the invoicing process, ensuring accuracy in billing while eliminating the need for contractors to raise separate invoices manually.
The feature simplifies the process for contractors, as they are paid directly based on the hours or days recorded in their timesheets.
To approve timesheets and raise an invoice:
Go to Multiplier’s client login and sign in with your User ID and password.
From the left panel, select Administration and then choose Timesheets.
From the Timesheets window on the right, select the Employee type drop-down option and choose Contractors.
Select the contractor you need to approve the timesheet and raise the invoice.
Select the Pending tab, then select the timesheet you want to approve.
If you wish to approve the timesheet, select Approve from the upper right.
From the dialog box that appears, select Approve timesheet.
Once you approve the timesheet, you can select Approve & create invoice.
Read more about .
The invoice gets created, and you can view it by selecting View Invoice from the upper right.
Note - Managers cannot view or approve invoices from the Contractor invoices module due to user-role-based settings. The invoice must be approved by HR admins, Billing admins, or Super admins.
The invoice amount calculated will be the contractor’s billing rate multiplied by the total hours/days worked. For eg.,
Hourly rate
If the total hours worked = 8
Billing rate = $100 per hour
Invoice amount = 8*100 = $800
Daily rate (8 hours is considered standard working hours in a day)
If the total hours worked = 20
Billing rate = $100 per day
Invoice amount = (100/8) * 20 = $250
Did you miss creating an invoice while approving the timesheet? Don’t worry; we have got you covered! Raise an invoice from approved timesheets by following the steps: .
Managers assigned as timesheet approvers, HR admins, and super admins can generate an invoice once a timesheet has been approved.
Timesheet-based invoices can be found under the Pending tab on the contractor invoices module under the Administration section. The invoice must then be approved by HR admins, billing admins, or super admins to process payments.
HR admins, Billing admins, and Super admins will have access to approve timesheet-based invoices. Managers don’t have access to approve timesheet-based invoices.
No, managers will not be able to approve the final invoice. They can only create an invoice based on the approved timesheet due to role-based user-access settings.
If managers miss creating the invoice while approving the timesheet, they can still raise it by following the steps in
No, contractors cannot create timesheet-based invoices. This action is exclusive to managers and admins. However, contractors can raise invoices manually based on timesheet inputs as required.
Yes, contractors are notified via email when an invoice is created based on approved timesheets by their manager.
What is severance payment accrual?
Severance payments are a critical component of employee compensation in many countries. These payments, often mandated by local labor laws, are provided to employees when their employment is terminated, whether due to redundancy, layoffs, or other eligible reasons. The amount typically depends on factors like the employee’s length of service and the country’s specific legal requirements.
Ensuring compliance with these regulations is not just a legal obligation but also a way to foster trust and transparency in employment practices.
Severance accrual is the accumulation of money throughout an employee's agreement to pay final severance obligations. These obligations are based on the length of the employee's service.
Multiplier will include a Severance Accrual charge in the client's monthly invoice each month. This amount is set aside to cover the employee's statutory severance entitlement during termination.
Unlike the deposit invoice, the Severance Accrual is a separate charge in monthly invoices. By accruing this amount over time, we help clients avoid large, unexpected severance payments at termination.
What Happens to Accrued Severance Amounts?
Utilized to pay the employee during termination to fulfill statutory obligations.
In the case of employee resignations, any unused severance accrual will be refunded, ensuring transparency and fairness.
Severance accrual helps clients avoid unexpected financial burdens. Instead of facing a large, lump-sum payment at the time of termination, severance accrual allows for small, predictable contributions to be set aside monthly. This proactive approach ensures:
Financial Planning: Smooth cash flow management and avoidance of surprise expenses.
Legal Protection: Full compliance with local labor laws, minimizing the risk of penalties or disputes.
Severance accrual safeguards both your business and your employees, providing peace of mind and financial stability.
Learn how companies determine .
Here is the list of countries where severance pay is a mandatory requirement. The accrual periods and payment amounts differ based on the specific regulations of each country.
Making payments to your employees and contractors is convenient and straightforward. You pay Multiplier using the platform, and we will ensure that your employees and contractors, in turn, receive their salaries & payments on time.
Learn how to make payments:
Log in to Multiplier using your credentials.
From the left sidebar, select Invoice payments.
In the Invoice payments screen, select the Pending tab.
Select the invoices you wish to pay under the Employee and Approved contractor invoices sections.
Note: For contractor invoices, use the filter to select the approved payables, such as invoices, approved expenses, and pay supplements. You can select more than one filter at a given time.
Once you select the invoices you want to be paid, a pay now option appears. Select Pay now.
Note: If you have any available credit notes, you can view the credit note information on the Invoice Payments module. Learn .
Review all the items and select Continue to pay from the lower right.
Note: A one-time management fee will be added for all the selected contractors.
If you wish to delete any item, select the delete next to the item you want to delete.
Choose a payment method and select Continue from the lower right.
Select Proceed to Checkout.
Note: To continue with checkout, your invoice(s) are bundled. A bundle means that multiple pay items will be combined into a single item, which will be the sum of all the individual pay items. When you bundle your invoices, a Reference ID is created against a bundle on Multiplier. This Reference ID will be used to identify & reconcile your payment once you have paid.
A bundle is created for the payment, and a Reference ID is generated. Select Continue.
A dialog box appears with your reference ID. Copy the reference ID and then select Continue.
Note: Copy and paste this Reference ID in the payment transfer notes while wire transferring the amount from your bank portal.
You now see Multiplier’s bank account information on your screen, transfer the funds to the Multiplier bank account from your bank account.
Note: Please include the Reference ID in the transfer notes for faster and smooth reconciliation.
Once the bank transfer is done, select Confirm I’ve paid from the lower right.
Once you select Confirm I’ve paid, your invoice status will change to processing & you can find the invoice under the Processing tab.
When Multiplier receives & reconciles the payment, the invoice status will be updated to Paid.
If you don't finalize a payment after creating a payment bundle, you can still pay the previously created bundled invoice by going to the invoice payments section. To pay a bundled invoice:
Log in to using your credentials.
From the left sidebar, select Invoice payments
In the Pending tab, under Payment pending for invoice bundle, select Pay now next to the bundle you wish to pay for.
In the checkout window, select Continue from the lower right.
A dialog box appears with your reference ID. Copy the reference ID and then select Continue.
You now see Multiplier’s bank account information on your screen, transfer the funds to the Multiplier bank account from your bank account.\
Once the bank transfer is done, select Confirm I’ve paid from the lower right.
Employees or contractors may need to be offboarded for various reasons, including resignation and termination. Learn how to offboard an employee or contractor who is terminated:
Login to Multiplier using your credentials.
From the left sidebar, select Team.
In the Team overview screen, select Active.
You can now see the list of all your employees and contractors. Select the person you want to offboard.
Scroll down to the bottom of the selected person’s profile and then select Offboard employee.
Select Termination as the reason for resignation and then select Continue.
Select the clause based on which the employee is being terminated from the given options.
In the box given under Mention the reason for termination, enter the appropriate reason and then select Continue.
Select the desired last working day and upload supporting documents. For instance, a warning letter sent to the employee, a company-wide email regarding termination, or any document that confirms your company's termination process.
Note -
Our team will review the desired last working day per local labor laws and get back to you in case the last working day needs to be changed.
For any termination, please consult Multiplier before you communicate with the employee. Multiplier, the Employer of Record, will manage all written termination communications. Please notify Multiplier as soon as possible, and we will guide you on when you can communicate with the employee after we have aligned on the termination process.
Select Continue.
If you would like to pay severance to the employee, select the duration for which you want to pay from the drop-down option.
You must also acknowledge to add & approve any expenses and pay supplements before the employee’s last working day.
Add any additional notes, if required.
Select Initiate offboarding to begin the off boarding process. The process includes:
Confirmation on the last working day to comply with labor laws - Multiplier will validate the supporting documents & the feasibility of the last working day. If the desired last working day does not comply with the country’s labor laws, we may need to adjust the date accordingly. Our team will get in touch with you to finalize the new date.
Email notification for employee’s last working day Once the last working day has been finalized with common consent between the company admin and Multiplier, we will email the employee confirming the last working date and the next steps in the offboarding process.
Full and final settlement (payment) process Multiplier will process the full and final settlement to the employee within 30 days after the last working day.
Once offboarded, please note that Multiplier has a lead time of 30 days to initiate the employee termination process.


Learn how to onboard a COR contractor on Multiplier.
Expand your recruitment pool to attract top-tier talent from around the globe and grow in new markets. You may need to procure work visas for your employees to However, navigating the intricacies of work visas can be daunting due to varying procedures and laws in countries worldwide.
Multiplier provides end-to-end visa assistance to streamline this process, ensuring a smooth and hassle-free experience for you and your employees.
Multiplier’s Visa procurement process:
- To be done by the Employer
- To be done by Multiplier after asking your employee to submit the required documents
Multiplier’s global payroll management platform facilitates smooth, compliant compensation for your geographically dispersed workforce. Reduce administrative burdens significantly and consolidate vendor relationships through our cost-efficient solution.
Learn how to onboard a global payroll employee on Multiplier.
Log in to using your credentials.
From the left sidebar, select Hire & Onboard.
Belgium
Honduras
Netherlands
Thailand
Bulgaria
Indonesia
Pakistan
Turkey
Canada
Ireland
Peru
Uganda
Colombia
Kazakhstan
Philippines
United Arab
Costa Rica
Kenya
Poland
Uruguay
Czech Republic
Lithuania
Rwanda
Argentina
Egypt
Madagascar
South Africa
Australia
Estonia
Malaysia
South Korea
Bangladesh
France
Mauritius
Spain
Belarus
Greece
Mexico
Taiwan


You are asked to log in to your multiplier account. Log in using your credentials.
If you decide to modify the LWD before accepting the resignation, Select Modify LWD & acknowledge resignation.
Inform the employee about modifying the LWD. Once done, check the box next to I confirm I’ve informed my employee about modifying their LWD. Select Continue.
In the Modify Last Working Day dialog box. Select the new proposed last working day. If your proposed LWD is earlier than the contractual LWD, you will have to select one of the 3 options for notice period shortfall pay:
Employee need not pay any amount
Employee needs to pay notice pay amount in lieu - If you choose for the employee to pay notice pay amount in lieu, then select the number of days’ pay that needs to be paid.
The company will pay the notice pay amount in lieu(currency).
Select Modify LWD & acknowledge resignation.
Once the employee signs and accepts the modified LWD, the status of offboarding changes.
On the employee profile, you will be able to see the status of the off-boarding, and also view the resignation document that has been signed by the employee.
Offboarding reason
Date offboarded
Time taken
Termination
Any date round the year
Lead time of 30 days for offboarding initiation
Enter the contractor’s details on the platform.
Multiplier sends an Independent Contractor Agreement to the contractor for signature.
The contractor must sign up on Multiplier and submit their details.
Once verified, the contractor will be activated on the platform.
Log in to Multiplier using your credentials.
From the left sidebar, select Hire & Onboard. Then select Contractor.
Select the country & state (wherever applicable) of the contractor.
Select Contractor of Record and then select Continue.
Read Multiplier COR terms and choose the appropriate answers.
Select Continue.
Note: COR is not applicable in a few countries for compliance reasons.
Enter the basic details such as Name, Gender, Email ID, Agreement Start and End Date.
Once all the details have been filled in, select Continue from the lower right.
Select the billing type you want for the contractor. You get two options:
Fixed rate: A fixed amount is paid every pay cycle, either monthly or semi-monthly.
Pay-as-you-go: The amount is paid hourly or daily based on the work done in a given period.
Enter the billing rate of the contractor. This will be the amount the contractor charges for their services for a specific duration. You get two billing rate options for each contractor type:
Hourly, Daily billing rate options for Pay-as-you-go contractors.
Semi-Monthly, and Monthly billing rate options for Fixed rate contractors.
Select the payout frequency. This is the frequency at which the contractor will be paid for their services. There are two options available for payout frequency:
Semi-monthly
Monthly
Select the invoice generation date in the Automatic invoice generation section.
Note: The automatic invoice generation feature is only applicable for fixed-rate contractors. If you disable automatic invoices for fixed-rate contractors, contractors would have to raise the invoices manually based on their work schedule
Pay-as-you-go contractors will always have to raise the invoices based on their working hours/day.
The automatic invoice generation section gives you one of two options depending if it is enabled or disabled:
Automatic invoice generation is enabled - The invoice will be generated on the selected dates.
Automatic invoice generation is disabled: On the selected date, contractors will receive reminders to create invoices manually.
Note: For fixed-rate contractors, this will be the date the invoice is automatically generated. For Pay-as-you-go contractors, this will be the date the invoice generation reminder is sent.
Add any additional pay components if required. Then select Continue.
Learn how to add additional compensation during onboarding.
Select the insurance plan for the contractor. You can include dependents, if necessary, and select Continue.
Note: Offering insurance to contractors is optional.
Fill in the Notice Period. Select Continue to proceed.
You'll be invoiced a one-time deposit equivalent to the contractor’s compensation during the notice period. For example, for a notice period of 2 months, you'll be charged a security amount equivalent to the contractor compensation of 2 months.
Note: Deposit payment is mandatory for contractor activation on the platform.
Select the drop-down under Work title and Add Work Title. The corresponding work description will be displayed. Once done, select Continue from the lower right.
If you don’t find the desired work title in the list, select Add description of work to add your custom work title and work description
Once done, select Continue.
The agreement is sent to the contractor for signing.
Ask the contractor to follow the steps on how to sign the agreement and get onboarded.
An Independent contractor agreement is signed between the contractor and Multiplier. After the contract is signed, the status changes to request details.
Once the contractor has signed the Independent Contractor Agreement, they will receive an email with instructions to sign up on the Multiplier platform. The contractor must submit their personal, KYC, and bank details. Our team will verify the contractor’s details and activate the contractor on the platform.
Ask the contractor to follow the steps in Add your details on Multiplier.
Once the contractor adds all the details. The status changes to Verification. At this stage, Multiplier initiates the verification of the contractor.
As soon as the verification is complete, the profile of the contractor is activated.
Initiate visa processing to help you move your employees quickly without any admin delays:
Login to Multiplier using your credentials.
From the left sidebar, select Hire & Onboard and then select EOR employee.
Select the country where the employee requires a work visa.
Under Is this employee a citizen or permanent resident of the selected country, select No, I would like Multiplier to assist me with getting a work visa.
Select Continue.
Fill in the basic details, add compensation, select an insurance plan (mandatory by law in some countries), and check compliance details (leaves, notice period, probation, solicitation, and non-compete policies).
Select Continue
On the compliance page, select Confirm and Proceed to continue.
Note: To edit the contract details, scroll down to the Review Contract Details section and select the edit icon next to each section. To delete the contract, select Delete.
Once the above details have been filled, the visa process will begin. There are five stages in the visa process.
Visa Feasibility Check: Once you have confirmed the employee's details, the employee will be required to upload certain documents for a visa eligibility check.
Contract Signatures: The Multiplier team will send the contract to the employee and signatory for signatures via email. For certain countries (list below), you can send the contract for signatures directly from the platform.
Visa Application: The visa will be filed by Multiplier's mobility team.
Onboarding Documents: The employee will be required to fill in additional details, such as bank details, payroll documents, approved work permit documents, etc, to continue the onboarding process.
Employee Activation: Our team will verify the details once the visa is issued, and the employee will be activated.
Once you have confirmed the employee’s details, the employee will be invited to sign up on the Multiplier platform and is requested to submit visa eligibility documents. In case any additional documents are required, Multiplier’s team will reach out to the employee via mail.
Once the documents are uploaded, the Multiplier team will begin the verification process.
Once the verification is done, a Visa Fee Invoice will be sent to you. This invoice must be cleared before proceeding to the next step.
Once the Visa Fee is paid, the contract will be sent to the employee and the signatory for signatures.
Note: For employees who require visas in Spain, Germany, Japan, and Singapore, you must send the contract for signatures by clicking on Send Contract as shown below.
Once the signatory signs the contract, it will be sent to the employee for signature. You will be able to view the status of the contract, as shown below.
Once the contract is signed, the visa application will be prepared and filed. At this stage, you will receive an email regarding the Deposit Invoice that needs to be cleared before onboarding the employee on Multiplier. Once done, the status shows Visa application filed.
Once the visa is filed and approved and the Deposit Invoice is paid, the employee is requested to fill in additional details, such as bank details, payroll documents, approved work permit documentation, etc, to continue the onboarding process on the platform.
Our team will verify the details submitted by the employee.
Once the visa is issued, details are verified, and payment of the ‘Deposit Invoice’ is made, our team will activate the employees on the platform and set them up for payroll. With this, the onboarding process will be complete.
From the onboarding screen, select Direct employee.
Use the Entity drop-down to select the entity you wish to hire the employee for.
Under How would you like to onboard, select Individually.
Enter the basic details to onboard a global payroll employee:
First name
Last name
Personal Email address
Work Email address (Optional)
Employee ID - Specify if you want the employee to have an ID.
Nationality
Phone Number
Department
Employment term:
a. Permanent: Provide the start date.
b. Fixed term: Provide the start and end dates.
If the employee is a people manager, enable the toggle next to This employee is a people manager. and then select Continue.
Enter the compensation details. Under Gross Salary, in the field under Amount, enter the salary you wish to pay the employee.
Enter the frequency for the amount to be paid in the field next to Per.
Select Year if the total salary provided is the annual salary.
Select Month if the total salary provided is the monthly salary.
Select the start date.
Enter the salary breakup components. Example - You are required to enter the Basic salary, HRA, LTA, and Special allowance. This may vary based on the configuration of the salary components.
(Optional) Select the Additional pay item to add additional compensation. In the dialog box that appears, enter the details as asked and select Add.
For detailed steps about adding an Additional pay item, follow .
Once done, select Continue.
In the insurance screen, you get three tabs:
15. Select the bank account
16. Enter Bank Details and then select Continue.
(Optional) Upload a signed employment contract. The contract you upload must be the final contract, which is signed and approved by you and your employee. Then select Continue.
Select Add Employee.
Since the employee does not have access to Multiplier, select Invite employee.
The invite is sent to the email address of the employee you provided. Once the employee completes signing up, they will be added to your organization.


Learn how to upload contractor invoices in bulk on Multiplier
Managing contractor invoices is now easier on Multiplier. The entire process comprises of just:
Uploading the invoices in bulk, and
Reviewing and approving them for payments
Note: You can also raise invoices or expenses for contractors who have been offboarded in the last 60 days.
To upload contractor invoices in bulk on Multiplier:
Log in to Multiplier’s portal
From the left sidebar, select Administration > Contractor invoices.
From the Import Contractor Invoices window on the right, select Import multiple contractor invoices icon.
Select New import.
From the Import Contractor Invoices window on the right, select Template to download the template. Admins can download this template and fill in the values for empty columns.
Note - The template is in a .csv format. The template contains the list of active Contractors and Contractors offboarded in the last 60 days.
The template contains pre-filled and to-be-filled columns. Admins must only enter the values for To-be-filled columns.
Calculate the amount by multiplying the values entered in the Quantity of work and Rate columns.
Once you’ve entered the contractors' details, return to the window from where you downloaded the template. Select Upload file and upload the template with the updated information.
Once the file is uploaded, select Continue.
Note - If you see an error uploading the file, check to understand how to fix them.
The uploaded file is validated. After the file is validated and uploaded, the summary is generated.
If there is no Failure, Select Review imported data.
Note: If you see failures in the summary, follow the to fix failures and re-upload the template.
Review the uploaded invoices. Here, you can see the total number of invoices uploaded and approve all of them at once. Select Approve Invoices to approve all the uploaded invoices.
Once approved, all the invoices added through bulk action will automatically go to Approved status. Admins can find them under the Approved section on the Contractor invoices page.
A summary is generated after completing the upload and validating the data. If your summary shows failures in validating data, you have options to:
Download the template again containing entries that have errors, fix the errors, and re-upload the fixed template. Follow the steps to .
Proceed with error-free invoices in the template where only error-free entries will be processed, and the rest will be parked. Follow the steps here to proceed with .
On the platform, select Error Report in the upper right to download the error report.
Fix the errors, go back to the window from where you downloaded the error report, select Browse file next to Upload fixed template, and upload the filed file.
Select Skip for now.
Select import 6 invoices and move forward with error-free entries.
Select Add 6 invoices.
Multiplier begins adding 6 approved invoices.
Approve the added invoices.
If you encounter errors while uploading:
Format mismatch – Ensure pre-filled columns remain unchanged.
Password-protected file – Remove password protection before uploading.
Incorrect value formats – Ensure currency, country, or numeric values match the required format.
Missing fields – Fill in all required fields before re-uploading.
You can revisit the template, fix the errors, and try uploading it again. The file will be updated successfully once all the fields are correctly filled.
Multiplier offers visa assistance in the following countries:
Australia
Kuwait
Poland
Spain
Bulgaria
It is important to note that each country has its timeline and visa application process. There are two main stages in visa processing: pre-application and post-application.
Pre-Application: In this stage, you must fill in the details of the employee on the platform. Once the details have been confirmed, the employee is requested to submit visa eligibility documents. Multiplier’s mobility team will meet with you and the employee to review the complete procedure and timelines. Once the documents are submitted by the employee and verified by our team, the contract is generated and signed. The next step undertaken is visa filing.
Depending on the destination country, this process can take 3-16 weeks. For example, the visa processing timeline in the UAE is three weeks; in Malaysia, it's sixteen weeks.
Post-Application: Once the visa application is filed, there is a waiting period for its approval. The duration of the waiting period again varies from country to country.
The joining date may get extended sometimes, depending on the visa procedures and processing time. In such scenarios, our team will send a ‘start date extension’ addendum with the new date. The company, the employee, and Multiplier must sign the addendum.
Get in touch. To understand the visa/immigration requirements in a particular country, you can contact us at .
Pricing for visa services can vary across regions and countries. In the preliminary visa assessment, our mobility specialists will assist you in identifying a suitable visa option for your employee. After the employee is onboarded on Multiplier, we will send you a deposit invoice (the deposit amount will be equivalent to the employee's salary during the notice period). Once the employee’s documents have been verified, we will send a visa fee invoice, including application processing charges. Again, this fee can vary across countries.
A visa fee invoice is the fee that Multiplier charges for visa processing - this may include government and documentation charges. In contrast, a deposit invoice is used as security to cover the notice period of the employee in the event their employment is terminated. This helps us ensure that the employee’s salary is disbursed even when invoice payments are delayed.
The employee will receive an email from Multiplier‘s team about the visa process initiation and the steps that must be followed.
The company and the employee will receive regular notifications from our visa team regarding the progress and latest updates in the visa application process.
Dedicated Case Manager
Every employee will be assigned a case manager to process the visa application as per country requirements.
Kick-Off Meeting
The objective of this meeting is to align on the various milestones in the entire visa process, along with associated timelines and the documents/information required. It's important to note that milestones and timelines might differ between countries due to embassy requirements and guidelines variations.
Bi-Weekly Email Updates
The objective is to provide clarity and transparency regarding the current status of visa processing. An email will be sent bi-weekly to the employee and employer outlining the next steps.
Once you have confirmed the details of the employee and the contract has been signed, the visa processing begins. There are five milestones in visa processing:
Visa Feasibility Check
Contract Signatures
Visa Application
Onboarding Documents
You can track the status of the milestones through the platform. Click on the particular employee’s name from the ‘Team’ module to check the status.
In addition to tracking the status on the platform, you will receive bi-weekly emails from Multiplier regarding the current status of the visa application.
Once the visa has been issued, the case manager will inform the employee and guide them to the following steps to complete onboarding.
To continue onboarding, the employee must fill in additional details, such as bank and work permit details. Once our team verifies the details, the employee will be activated on the platform.
In addition to tracking the status on the platform, you will receive emails from Multiplier when the employee onboarding is complete.
There are two stages in the visa process:
Visa Onboarding: Involves filling in the basic details of the employee, compensation, and frequency, selecting insurance, and checking compliance.
Visa Processing There are five steps in this stage:
Visa Feasibility Check: Once you have confirmed the employee's details, the employee will be required to upload certain documents for a visa eligibility check.
Contract Signatures: The Multiplier team will send the contract to the employee and signatory for signatures via email. For certain countries such as Spain, Germany, Japan, Singapore, etc, you must send the contract for signatory and employee signatures from the platform.
Visa Application: The Multiplier team will initiate the visa filing process.
Onboarding Documents: The employee will be required to fill in additional details like bank details, payroll documents, approved work permit documentation, etc, to continue the onboarding process on Multiplier.
Visa feasibility check refers to a check done by our mobility team to see if the employee is eligible to apply for a visa in the respective country.
Once you have confirmed the employee's details, the employee must upload certain documents to conduct the eligibility check.
Multiplier does the feasibility analysis to ensure the employee meets the visa requirements and successfully files the visa. If we foresee any concerns, we will inform you and the employee at this stage.
To ensure the success of the visa application, we do the feasibility check of the applicant to ensure we do all the pre-checks for a successful visa filing. The outcome of a visa application hinges on various factors, starting from the applicant's circumstances and decisions made at the discretion of the visa-granting authority in the destination country.
Yes, Multiplier works closely with your employees and handles all the legal aspects as mandated by respective authorities and governments. We ensure visa procurement by providing visa sponsorship, administration, and other support to help companies support their employees in obtaining a work visa or entry permit.
To sponsor a visa, the employee will be issued an employment contract from Multiplier’s end.
Learn how insurance premium is calculated on Multiplier's platform
Before you begin reading how the calculation works, here are some basic insurance terms to help you better understand the calculation.
The insurance premium is calculated differently for different segments:
The individual plan covers the employee under an insurance plan and comes with a health ID for the employee.
The employer will be billed for one year (annually) in all countries (except the USA). Insurance invoices for US employees will be billed monthly by Multiplier.
For example, if the premium for the individual is $70 per month. The total premium for the individual for 12 months will be $840.
The platform fee is $25 per month, and the total platform fee for 12 months will be $300.
Note: The platform fee is charged only in some countries.
Total insurance amount = $1140 (Individual Premium + Platform Fee)
Note - Employer-employee split in the premium is applicable in a few countries. This means the total amount is split between the employer and the employee, and both contribute a certain percentage. The employer chooses the percentage contribution during onboarding.
Suppose the employee is also contributing to the premium. In that case, i.e., there is a split between employer and employee for the premium, the employee contribution will be deducted from the employee's salary every month. It will be a part of the payroll.
Let us take an example to understand the pricing split of the premium amount. Let’s say the employer decides to contribute 70% of the premium. This means the employee will contribute 30%.
If dependents have been added for an employee, note that the health ID for all the dependents will be different. This is because each dependent will be covered under a different insurance plan. Also, the premium contribution made for every dependent may differ based on certain age-band criteria.
The employer will be billed for one year (annually) in all countries (except the USA). Insurance invoices for US employees will be billed monthly by Multiplier.
For example, let’s say the premium for the individual is $70 per month. The total premium for the individual for 12 months will be $840.
Let's say there are 2 dependents - the premium for 1 is $70, and the other is $80. Thus, the total premium for dependent 1 for 12 months will be $840, and the total premium for dependent 2 for 12 months will be $960.
In the above example, there is a difference in premiums charged due to age-band pricing applicable in some countries. The premium for each dependent will be charged separately.
If age-band pricing is not applicable in a country, then the premium charged will be the same for both dependents, i.e., the same price, either $70 for both dependents or $80 for both.
Platform fee will be charged thrice since there are 3 insured individuals. If the platform fee is $25 per month, the total platform fee for 12 months will be $300. Since 3 individuals are insured, the total platform fees will be $300 multiplied by 3, i.e., $900.
The platform fee is charged only in some countries.
Total amount = $3540 (Individual Premium + 2 Dependents Premium + Platform Fee)
Note - The employer-employee split in the premium is applicable in a few countries. This means the total amount is split between the employer and the employee, and both contribute a certain percentage. The employer chooses the percentage contribution.
If the employee is also contributing to the premium, i.e., if there is a split between employer and employee for the premium, then the employee contribution will be deducted from the employee's salary every month and will be a part of the payroll.
Let us take an example to understand the pricing split of the premium amount. Let’s say the employer decides to contribute 70% of the premium. This means the employee will contribute 30%.
If the family plan has been selected, the health ID for all the family members will remain the same, i.e., only one health ID for all members covered under the family plan.
The employer will be billed for one year (annually) in all countries (except the USA). Insurance invoices for US employees will be billed monthly by Multiplier.
Let’s take an example where the premium of a family plan is $250 per month.
Since only one policy covers the entire family, the platform fee will be charged once, i.e., $20 per month, and the total platform fee for 12 months will be $240.
The platform fee is charged only in some countries.
Total amount = $3300 (Family Premium + Platform Fee)
Note - The employer-employee split in the premium is applicable in some countries. This means the total amount is split between the employee and employer, and both contribute a certain percentage. The employer chooses the percentage contribution.
Suppose the employee is also contributing to the premium. In that case, i.e., there is a split between employer and employee for the premium, the employee contribution will be deducted from the employee's salary every month. It will be a part of the payroll.
Let us take an example to understand the pricing split of the premium amount. Let’s say the employer decides to contribute 70% of the premium. This means the employee will contribute 30%.
Managing employee benefits efficiently is crucial for HR leaders. You can:
Set up company benefits before onboarding
Set up company benefits policy while onboarding
Give custom benefits to a member while onboarding
Login to using your credentials.
From the left sidebar, select Benefits.
Select Setup Employee Benefits.
From the Setup Employee Benefits screen, go to Select A Country dropdown and select the country for which you want to set up benefits policy.
From the Employment type dropdown, select the desired Employment type. You get three options:
EOR Employees
Contractors
AOR(s)
Click the Select button to select from the available plans.
Tip: You can select Compare Plans to compare the benefits and then make an informed decision.
(Optional) In countries where bundled plans are unavailable, you can include dependents after selecting the insurance plan. You can choose to include dependents in the plan. Select the checkbox next to Include dependents and select the number of members to include in the list of dependents.
Select Continue.
Review the benefits policy and select Confirm from the lower right.
Once the policy is set, all future employees from the selected country are automatically assigned the appropriate benefits, ensuring consistency and compliance.
You can set up a company benefits policy while you hire & onboard:
Login to using your credentials.
From the left sidebar, select Hire & onboard
Select the employee type or contractor you wish to onboard.
To hire and onboard an employee type of your choice, specify the country, basic details, and compensation details of the new hire.
From the Insurance window, click Select for the desired Insurance type.
The checkbox next to Auto-apply this insurance to all new Contractors/employees is selected by default. Selecting this ensures that all future hires get this policy as default.
Note - If you deselect this, the policy only applies to the current employee/contractor.
Select Continue.
Select the type of contract and select Continue.
Review the contract and send it for signature.
You can manage exceptions while hiring & onboarding:
You can set up a company benefits policy while you hire & onboard:
Login to using your credentials.
From the left sidebar, select Hire & onboard
Select the employee type or contractor you wish to onboard.
To hire and onboard an employee type of your choice, specify the country, basic details, and compensation details of the new hire.
Provide custom insurance to a member by selecting click here at the bottom.
Click the Select button to select from the available plans.
Tip: You can select Compare Plans to compare the benefits and then make an informed decision.
(Optional) In countries where bundled plans are unavailable, you can include dependents after selecting the insurance plan. You can choose to include dependents in the plan. Select the checkbox next to Include dependents and select the number of members to include in the list of dependents.
You can switch back to giving benefits as per the set policy by selecting Click here from the bottom.
Learn how to onboard a contractor on Multiplier
Onboarding contractors through Multiplier is effortless. You can onboard contractors worldwide through the Multiplier platform in simple steps.
To onboard contractors on the platform:
Log in to Multiplier's platform. Select Hire & Onboard from the left sidebar.
Select Contractor from the window that appears.
In the dialog box that appears, Select Add Contractor.
Note: To learn how to onboard multiple contractors, go to .
Select the country in which you wish to hire and then select the type of contractor. Select Hire on my own entity. The contractor is hired on your own entity.
Note: To learn how to hire a COR contractor, go to .
Enter basic details such as Name, Gender, Email ID, Tax Residency, Job Title, Contract Duration, and Job description/Scope of work.
Once all the details have been filled, select Continue from the lower right.
Select the billing type you want for the contractor. You get two options:
Fixed rate: A fixed amount is paid every pay cycle, either monthly or semi-monthly.
Pay-as-you-go: The amount is paid hourly or daily based on the work done in a given period.
Enter the billing rate of the contractor. This will be the amount the contractor charges for their services for a specific duration. You get two billing rate options for each contractor type:
Semi-monthly and Monthly billing rate options for fixed-rate contractors.
Hourly and daily billing rate options for Pay-as-you-go contractors.
Select the payout frequency. This is the frequency at which the contractor will be paid for their services. There are two options available for payout frequency:
Semi-monthly
Monthly
Select the invoice generation date in the Automatic invoice generation section.
Note: The automatic invoice generation feature is only applicable for fixed-rate contractors. If you disable automatic invoices for fixed-rate contractors, contractors would have to raise the invoices manually based on their work schedule.
Pay-as-you-go contractors will always have to raise the invoices based on their working hours/day.
The automatic invoice generation section gives you one of two options, depending on whether it is enabled or disabled:
Note: For fixed-rate contractors, this will be the date the invoice is automatically generated. For Pay-as-you-go contractors, this will be the date the invoice generation reminder is sent.
Add any additional pay components if necessary. Then select Continue.
In the Benefits & Extras, you get three tabs:
Select Continue.
Select the type of Contract. You can choose to upload your contract or select Multiplier Contract, where Multiplier generates a standard contract. Then select Continue.
Note: If you are uploading your own contract, ensure that you and the contractor have duly signed it.
If you’ve not added a signatory, you are required to add a signatory. Select Add Signatory. In the dialog box that opens, enter the details and then select Add.
Review and Send the Contract.
After you send the contract, the contractor will receive an email with the instructions to sign up on the Multiplier platform


Hire and onboard employees in over 150 countries swiftly and compliantly with Multiplier's EOR, eliminating the need to establish legal entities.
To onboard employees through Multiplier’s EOR solution:
Log in to using your credentials.
From the left sidebar, select Hire & onboard.
When managing many contractors, uploading contracts individually can be time-consuming and inefficient. Bulk upload simplifies this process by allowing you to onboard multiple contractors simultaneously, saving time, reducing manual errors, and streamlining your workflow. When scaling quickly, this feature ensures a smooth and consistent experience.
To onboard contractors in bulk, you need to download a template from Multiplier, enter the required details, and upload the filled template on the platform.
Learn how to onboard contractors in Bulk on Multiplier:
Log in to using your credentials.
From the left sidebar, select Hire & onboard.
Premium of the individual
$70
Total premium
$70*12 months = $840
Platform fee
$25
Total platform fees
$25*12 months = $300
Employer will contribute
70% of $1140 = $798
Employee will contribute
30% of $1140 = $342
Premium of the individual
$70
Total premium
$70*12 months = $840
Premium of insured dependent 1
$70
The total premium for dependent 1
$70*12 months = $840
Premium of insured dependent 2
$80
The total premium for dependent 2
$80*12 months = $960
Platform fee
$25
Total platform fees
$25*12 months*3 dependents = $900
Employer will contribute
70% of $3540 = $2478
Employee will contribute
30% of $3540 = $1062
Premium of the family plan
$250
Total premium
$250*12 months = $3000
Platform fee
$25
Total platform fees
$25*12 months = $300
Employer will contribute
70% of $3300 = $2310
Employee will contribute
30% of $3300 = $990
Employee Activation: The team will verify the details once the visa is issued. The employee will be activated.
Luxembourg
Portugal
Sweden
Malaysia
Qatar
Malta
Russia
Ireland
Mexico
Saudi Arabia
UAE
Netherlands
Singapore
UK
Slovenia
Vietnam


Payable Start Date/End Date is after Contract End Date - Ensure that the Payable start date & end date are on or before the offboarding date for the contractor.
Pre-filled
To be filled
Employee id
Amount
Contractor Full Name
Payable start date
Contract type (AOR / Contractor)
Payable end date (Should be > Payable from)
Contractor email (personal - entered during onboarding)
Description
Country
Currency (Contract/Invoice currency)
From the given options, select the insurance plan as required.
Select Continue. You are directed to the Extended Benefits tab.
Once submitted, Multiplier’s team reaches out to you for further processing regarding background checks.


Select the country you wish to onboard from.
Select the employee's residency status. Choose Yes if the employee is a citizen of the hiring country. Choose No if work visa assistance is needed or to confirm the employee has a valid work permit for that country.
Select Continue.
Enter the basic details to onboard an EOR employee:
First name
Last name
Personal Email address
Work Email address (Optional)
Employee ID (Optional) - Specify if you want the employee to have an ID.
Nationality
Phone Number
Department (Optional)
Employment term
If the employee is a people manager, enable the toggle next to This employee is a people manager. and then select Continue.
Select the Compensation structure.
Note - This may vary depending on the country of the person getting hired.
Enter the compensation details. In the Total CTC_fixed section, under Amount, enter the salary you wish to pay the employee.
Enter the frequency for the amount to be paid in the field next to Per.
Select Year if the total salary provided is the annual salary.
Select Month if the total salary provided is the monthly salary.
Tip: In case you wish to view the salary breakdown, select the Salary Breakdown dropdown.
Optional) Select Add additional pay if you wish to add additional pay components for the employee. From the Additional Pay Item dialog box, enter the details as asked and then select Add.
For detailed information on how Additional pay may differ based on the country you are hiring in, follow Additional Compensation.
Under Contributions, you can adjust the Employer and employee contributions as per the laws of the country you are hiring in.
Note: According to local regulations, the contributions from both the employer and employee are fixed and cannot be modified.
(Optional) Select ESOP for the employee if you wish to add ESOP. Enter the details as asked on the screen and then select Add.
Select Continue from the lower right.
In the Benefits & Extras screen, you get three tabs:
In the compliance screen, you can review the default leaves provided as per compliance. Select Add/Edit leaves to add or edit the leaves. Add/edit the leaves as required and select Update Leaves.
As per compliance policies in the country you are hiring, you can enable or disable the toggle to:
Enable/disable the probation period or select edit to edit the Probation period
Enable/disable notice period or select edit to edit the notice period
Enable/disable Non-solicitation period or select edit to edit the Non-solicitation period
Enable/disable Non-compete period or select edit to edit the Non-compete period
Once done, select Continue.
You may be asked to add a Signatory for your company. Select Add Signatory. Add their details and submit.
Note: Signatory is the person responsible in your company whose name and signature appear on the Employment contract. Ex: CHRO, CEO, COO, Director of the department, etc
Select Send Contract to send the contract for signature.
Note: You can select Review Contract if you wish to review the contract before sending it for signature.
The contract is sent to your company's signatory. You can find the company signatory is listed next to Signatory. After your company’s signatory signs, the contract is shared with the new hire via the email you provided.
To view the next steps, select See all steps next to Complete all the steps to complete onboarding. Once the contract for the new hire is sent for signature:
The new hire receives an email to sign the contract.
Upon signing, they receive a platform onboarding email.
Multiplier requests KYC and the necessary documents.
Multiplier shares mandatory payroll and compliance forms.
Once the new hire completes these, Multiplier shares the contract with you for your signature.
You pay the deposit.
The new hire's employee ID and work email are activated.
To ensure your new hires know all the steps to get onboarded, help them follow the steps in Onboard as an EOR employee on Multiplier.
From the onboarding window, select Contractor.
In the dialog box that opens, select Bulk Upload.
Select Pay a contractor as the type of contractor.
Pay a contractor is a Contractor hired directly by you.
Select Continue.
Select Template to download the template.
Enter the details as per the template.
If you wish to understand the fields in the template, go to Fields in the template for bulk contractor onboarding.
Once done, select Upload file on the platform.
Select Continue.
Multiplier verifies the details added in the template. Once the details are verified, you see a summary of the entries identified.
If you see failures in the summary, learn how to fix failures and reupload the fixed template.
Select Continue.
In the Manage Contractors window, under the Imported tab, you see the list of contractors validated by the Multiplier platform as per your entry in the template. Select Add to team.
has beenThe contractor is added to your team. The added contractors are in the Team overview section, under the Onboarding tab.
It might happen that you miss or mistakenly enter incorrect details in the template. If the summary window shows counts of failure, you can cross-check the filled template uploaded by you, fix the errors, and upload the fixed template.
Learn how to fix the errors: 1. Select Error report in the upper right of the summary window.
2. Open the error report. Under the Error Description column, you will see the reason for the error.
3. As per the error, enter the correct details and save them.
4. Return to the platform and select Browse next to Upload fixed template.
5. Select Continue.
6. Multiplier validates the fixed template. Once done, it updates the summary. If there are no failures, select Continue.
7. In the Manage Contractors window, under the Imported tab, you see the list of contractors validated by the Multiplier platform as per your entry in the template. Select Add to team.
Country
Mandatory
Add your contractor's tax residency country
Contractor Id
Optional
Unique identifier for a contractor
Designation
Mandatory
Job title of the contractor
Contract Start Date
Mandatory


Learn how to integrate BambooHR with Multiplier
Integrating BambooHR with Multiplier enables easy data synchronization, eliminating manual data entry and ensuring accurate employee records. This integration allows HR teams to efficiently manage employee details, payroll processing, payslips, and leave tracking across both platforms.
To connect BambooHR with Multiplier, you require:
1. API Key (Application programming interface): The API key is generated by the BambooHR admin. Use an existing API key or create a new one by following these steps:
a. Login to your BambooHR account and select the Profile icon.
b. Select API Keys.
c. Use an existing API key or create a new one by selecting Add New Key.
d. Enter the API Key Name and select Generate Key.
An API key is a unique code that identifies and authenticates an application or user when it requests an API. API keys connect software interfaces and allow software to communicate and share data.
e. The API key is generated. Select Copy Key, save it in your notepad, and select Done.
2. Sub-Domain: Provided by the BambooHR admin. The subdomain will be part of the base URL you use to access the API, typically in the format your_subdomain.bamboohr.com.
After you have the prerequisites listed in the previous section, follow these steps to integrate BambooHR with Multiplier successfully.
Before starting, ensure the following settings are correctly configured in BambooHR:
1. Set the Location: Ensure the location is correctly set in BambooHR and matches the Entity MSA.BambooHR admin needs to step up the location.
a. Login to the BambooHR dashboard. Select settings from the upper right.
b. From the left sidebar in the settings window, select Employee Fields.
c. Once the Employee field opens, select Location.
d. Select New Location. Enter the information in the required fields and select Add.
2. Add Job Titles: Job titles must be added in BambooHR to prevent sync errors (e.g., Engineer, QA, etc.)
a. Login to the BambooHR dashboard. Select settings from the upper right.
b. From the left sidebar in the settings window, select Employee Fields.
c. Once the Employee field opens, select Job Titles.
d. Enter the Job title and select Add. Ensure that the correct job titles are added.
1. Log in to your Multiplier account.
2. From the left sidebar, select Settings > Integrations.
3. Select the App directory tab.
4. Select BambooHR and then click on Connect.
5. Enter the Sub-Domain and API Key. If you don’t have this information. to find the sub-domain and API key.
6. Select Submit to complete the integration, and then select Close.
Prerequisite: Ensure employees are activated on the Multiplier platform. If the employees are not activated, their profiles will not sync.
1. After completing the integration, go to Settings > Integrations.
2. Select the connection tab. Go to BambooHR.
3. Enable the toggle next to EOR employees' data sync and select Continue.
4. Once enabled, all the EOR employees listed in the Multiplier platform will start syncing to BambooHR.
Note - Wait for a few minutes after the syncing is done. You can find the synced employee profiles under the People tab in the BambooHR platform.
1. After completing the integration, go to Settings > Integrations in the Multiplier platform
2. Select the connected tab. Go to BambooHR.
3. Enable the toggle next to Global payroll employees’ data sync in Multiplier.
4. Select Confirm to Complete the setup. Employees with validated data will sync to Multiplier.
Note: The Global Payroll Data sync can only be enabled when at least one entity's information is fully mapped. To map multiple entities, the client has to first get the entities created in Multiplier.
5. All the employees listed in the BambooHR’s People tab start appearing in the Team section of the Multiplier platform. Navigate to Team from the left sidebar of the Multiplier platform.
Admins can create or use an existing payslip folder to sync the payslip.
1. Login to the BambooHR dashboard. Navigate to My info > Documents.
2. Select an existing payslip folder or create a new one:
Select the existing Payslips folder - Select any folder from the list of folders on the platform. Select Upload to upload the payslips.
Upload a payslips folder - Select Upload to upload a folder.
Create a custom payslips folder - Select the Add Documents icon to create a custom folder.
3. Once done. Go to Multiplier’s portal. From the left sidebar, select Settings > Integrations, select the designated folder.
4. Select the Plugins tab.
5. Select Enable next to Pay slips. When a payslip is published for an employee, this sync helps deliver it to BambooHR.
Prerequisites: Ensure that the leave policies are created in BambooHR.
1. Login to Multiplier’s portal.
2. From the left sidebar, select Settings > Company Settings > Company Policies > Time Off Policies.
3. Use the Leave Mapping UI in Multiplier to map BambooHR leave types.
4. Enable Time Off Sync to import approved leave data from BambooHR to Multiplier.
5. Employees' leave counts will be updated automatically.


Integrating Personio with Multiplier helps with easy data synchronization, eliminating manual data entry and ensuring accurate employee records. This integration allows HR teams to efficiently manage employee details, payroll processing, payslips, and leave tracking across both platforms.
To integrate Personio with Multiplier, you require:
This integration facilitates bidirectional data synchronization between Multiplier and SAP SuccessFactors.
Multiplier to SuccessFactors
Upon completion and verification of onboarding for all employee types (EOR, Contractor, AOR Contractor) in Multiplier, their data will be synced to SuccessFactors. These employees will appear as ACTIVE in SuccessFactors from their start date. Subsequent modifications to employee data within Multiplier, including personal and compensation details made by either the administrator or the employee, will be reflected in SuccessFactors.
SuccessFactors to Multiplier
All direct employees within SuccessFactors will be synced to Multiplier, and their profiles will be automatically created on the platform. Basic details, compensation information, and employee status will be synchronized and continuously updated based on changes made in SuccessFactors by either the administrator or the employee. This synchronization allows for global payroll processing for all direct employees through Multiplier.
Note: One-time bonuses, expenses, and time-off requests must be manually added as pay supplements in Multiplier before the payroll cut-off date to be included in the payroll.
How to integrate Zoho People with Multiplier?
Integrating Zoho People with Multiplier helps easy data synchronization, eliminating manual data entry and ensuring accurate employee records. This integration allows HR teams to efficiently manage employee details, payroll processing, payslips, and leave tracking across both platforms.
To integrate Zoho People with Multiplier:


The client ID is generated from your Personio account. To generate a client ID and client secret:
Log in to your Personio account using your credentials.
From the left sidebar, select Settings from the lower left.
Under Integrations, select API credentials.
Select Create custom integration.
In the text box under Name, enter a Custom integration name.
Configure access rights. Select the attributes for which you want to grant access rights. Multiplier can fetch data from Personio for the selected attributes. You can select from the two permissions:
Read - Can only read the information
Write - Can edit the information
Once done, select Create integration.
You get your client ID and client secret. Copy the client ID and client secret and save it. You won’t be able to retrieve it again. Then select Finish.
Select Yes, proceed.
Log in to Multiplier using your credentials.
From the left sidebar, select Settings > Integrations.
In the Integrations window, scroll down and select Personio.
Select Connect.
In the dialog box that opens, enter your Personio Client ID, Personio Client Secret.
To retrieve Personio client ID and Personio Client Secret, follow the steps in Prerequites to integrate Personio with Multiplier.
Enter your Personio Application Identifier as per your personio URL. To find your identifier, refer to Personio Application identifier.
Select Submit. Once done, Personio is integrated and the status shows connected.
Prerequisite: Ensure employees are activated on the Multiplier platform. If the employees are not activated, their profiles will not sync.
Once you have integrated Personio with Multiplier, from the left sidebar go to Settings > Integrations
Select the Connected tab.
Select Personio.
Enable the toggle next to EOR Employees’ data sync.
In the dialog box that appears, select Continue.
EOR employee’s data is synced.
Once you have integrated Personio with Multiplier, from the left sidebar go to Settings > Integrations
Select the Connected tab.
Select Personio.
Enable the toggle next to Global payroll employees’ data sync.
The data is fetched from personio to Multiplier. This can take several minutes and depends on the number of employees
Frequency of sync - Once in 6 hours
Type of sync - API
Sync Trigger: Automatic
Direction of Data flow - Personio to Multiplier
Basic details
First name
first_name
Basic details
Last name
last_name
Basic details
Gender
gender
Basic details
Date of birth
Before you begin connecting SAP SuccessFactors with Multiplier, ensure you have the following:
Log in to Multuplier using your credentials.
From the left sidebar, select Settings > Integrations.
From the Integrations screen, select SuccessFactors.
From the SuccessFactors screen, select Connect.
In the SAP SuccessFactors dialog box, enter the details as asked. You found these details while following the steps in the Prerequisites section:
After selecting Submit, the connection is done.
Once the connection is successful, you can now sync your EOR employees' and GP employees' data.
Setting the job location and job titles of employees in Zoho people is essential for transferring data from Zoho People to Multiplier once the integration is done:
Login to your Zoho people account using your credentials.
Select Operations from the lower left.
Under Services, select Employee Information.
From the horizontal bar at the top, select the Employees tab.
Select the employee for whom you wish to add the location and job title.
Under the Work Information tab, add the Location and Designation.
Once done, select Close from the lower left.
Learn how to Integrate Zoho with Multiplier:
Login to Multiplier using your credentials.
From the left sidebar, select Settings > Integrations.
In the Integrations window, scroll down and select Zoho People.
In the Zoho People screen, select Connect.
From the dialog box that appears, use the dropdown to choose a country and then select Submit.
In the screen that appears, read the terms and select Accept.
Zoho people is now integrated with Multiplier.
To ensure the proper flow of data, data fields from Multiplier need to be matched with Zoho People fields. Please match them to each other to complete the integration setup. To map fields:
From the leftsidebar, select Settings > Integrations.
In the Integrations window, scroll down and select Zoho People.
Select Map fields.
In the Manage Profile creator plugin window, select Map fields next to any one of the entity.
Map fields as required. For the correct transfer of data, accurate field mapping is necessary.
Note: The name of fields might differ on both the platforms, hence ensure that you accurately map the fields. For example, an employee’s first date on Multiplier is called Start On, while on Zoho People, it’s called Date of Joining.
Note: The fields marked with * are mandatory.
Select Continue.
Map Gender and Bank Country.
Select Complete Mapping from the lower right.
Once the mapping is completed, you can select Enable data sync.
For the entities marked as Fully mapped in the status column, you can select the toggle next to them to enable data sync.
Select Confirm to complete the integration setup.
Once connected, you get an option to Enable EOR employees’ data sync.
To enable EOR Employees’ data sync:
Login to Multiplier using your credentials.
From the left sidebar, select Settings > Integrations.
In the Integrations window, scroll down and select Zoho People.
Under the Integration settings. Select the toggle next to EOR employees’ data sync.
In the dialog box that appears, select Continue.
The Data is synced for EOR employees
To enable Global Payroll data sync, ensure you have mapped the fields accurately and the entity for which you wish to enable GP sync is fully mapped. Data filed mapping is necessary to ensure that data is accurately transferred from Zoho people to Multipler. Learn how to enable GP data sync:
Login to Multiplier using your credentials.
From the left sidebar, select Settings > Integrations.
In the Integrations window, scroll down and select Zoho People.
Under Integration settings, turn on the toggle next to Global payroll employees’ data sync.
For the entities marked as Fully mapped in the status column, you can select the toggle next to them to enable data sync.
Once done, select Confirm.
Global payroll data sync is complete.
Date of joining of the contractor in YYYY-MM-DD format
Contract End Date
Optional
Contract end date for the contractor in YYYY-MM-DD format
Job Description
Optional
Job Description of the Contractor
First Name
Mandatory
First name of the contractor
Last Name
Mandatory
Last name of the contractor
Mandatory
Email address of the contractor
Gender
Mandatory
Gender of the contractor
Payroll Frequency
Mandatory
Expected payout frequency. You get two options:
Monthly
Semi-monhtly
Rate Frequency
Mandatory
Billing Rate frequency of the contractor
You get four options:
Hourly
Daily
Monthly
Semi-monhtly
Currency
Mandatory
Billing currency of the contractor
Base Pay
Mandatory
Base Pay Rate of the contractor


When managing many contractors, onboarding contractors individually can be time-consuming and inefficient. Bulk upload simplifies this process by allowing you to onboard multiple contractors simultaneously, saving time, reducing manual errors, and streamlining your workflow. Whether scaling quickly, this feature ensures a smooth and consistent experience.
To onboard contractors in bulk, you need to download a template from Multiplier, enter the required details, and upload the filled template on the platform.
Learn how to onboard contractors in Bulk on Multiplier:
Log in to Multiplier using your credentials.
From the left sidebar, select Hire & onboard.
From the onboarding window, select Contractor.
In the dialog box that opens, select Bulk Upload.
Select Contractor of Record as the type of contractor
Contractor of record contractor is a Contractor hired on Multiplier’s legal entity.
Under Multiplier COR Terms, read the terms and conditions and select the appropriate response.
Select Continue from the lower right.
Select Template to download the template.
If you wish to understand the fields in the template, go to .
Enter the details as per the template.
Once done, select Upload file on the platform.
Select Continue.
Multiplier verifies the details added in the template. Once the details are verified, you see a summary of the entries identified.
If you see failures in the summary, l.
Select Continue.
In the Manage Contractors window, under the Imported tab, you see the list of contractors validated by Multiplier platform as per your entry in the template. Select Add to team.
The contractor is added to your team. The added contractors can be found in the Team overview section, under the Onboarding tab.
It might happen that you miss or mistakenly enter incorrect details in the template. If the summary window shows counts of failure, you can cross-check the filled template uploaded by you, fix the errors, and uploadthe fixed template.
Learn how to fix the errors: 1. Select Error report in the upper right of the summary window.
2. Open the error report. Under the Error Description column, you will see the reason of error.
3. As per the error, enter the correct details and save it.
4. Go back to the platform and select Browse next to Upload fixed template.
5. Select Continue.
6. Multiplier validates the fixed template. Once done, it updates the summary. If there are no failures. Select Continue.
7. In the Manage Contractors window, under the Imported tab, you see the list of contractors validated by the Multiplier platform as per your entry in the template. Select Add to team.


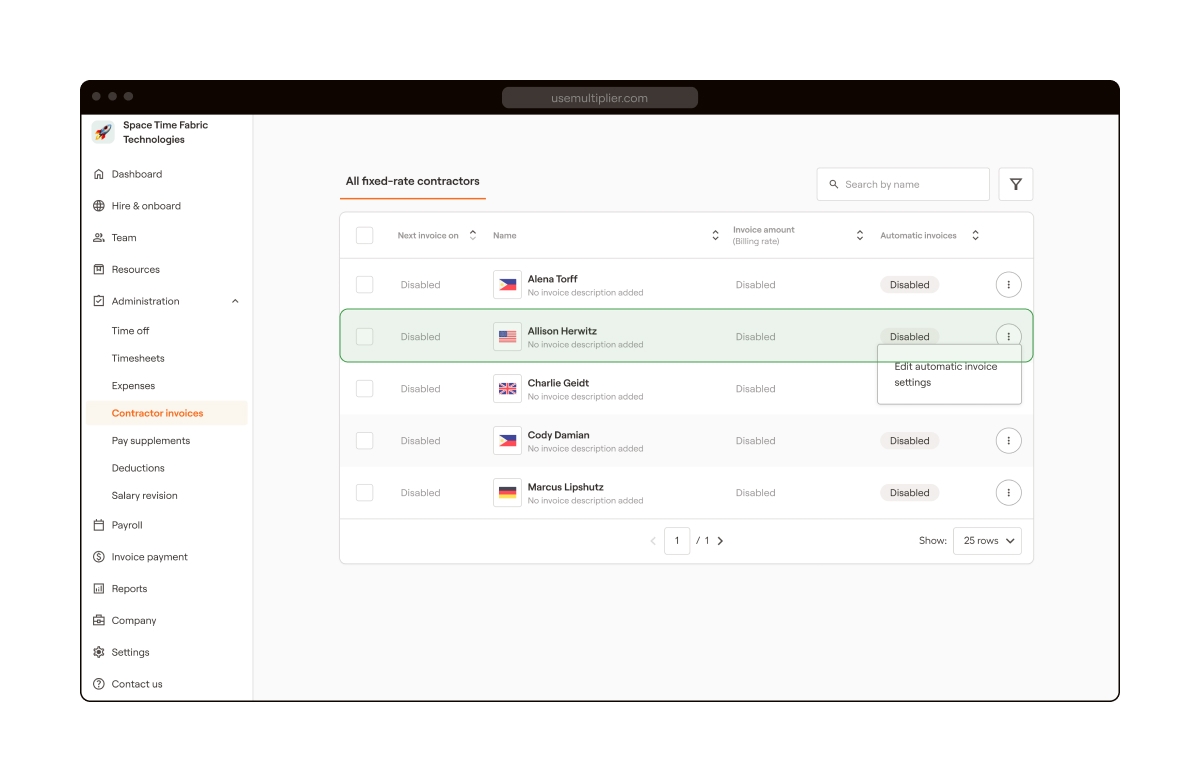
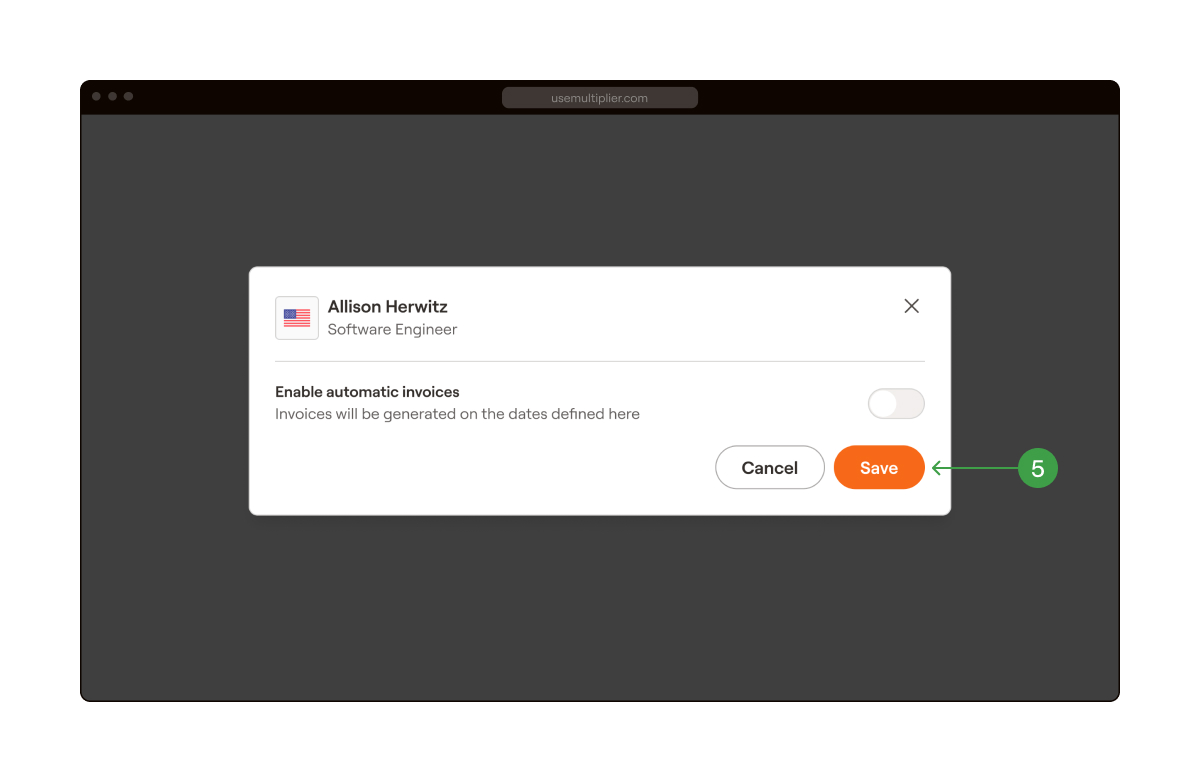

Contract End Date
Mandatory
Contract end date for the contractor in YYYY-MM-DD format
Job Description
Mandatory
Job Description of the Contractor
First Name
Mandatory
First name of the contractor
Last Name
Mandatory
Last name of the contractor
Mandatory
Email address of the contractor
Gender
Mandatory
Gender of the contractor
Phone Number
Mandatory
Phone number of the contractor
Current Address Line1
Mandatory
Street address of the contractor
Current Address Line2
Mandatory
Street address of the contractor
Current Address City
Mandatory
City of residence of the contractor
Current Address State
Optional
State/province of residence of the contractor
Current Address Country
Mandatory
Country of residence of the contractor
Current Address Postal Code
Mandatory
Postal/zip code of the residential address
Notice After Probation Value
Optional
Notice period for the contractor after probation
Notice After Probation Unit
Optional
Unit of Notice period
Payroll Frequency
Mandatory
Expected payout frequency. You get two options:
Monthly
Semi-monhtly
Rate Frequency
Mandatory
Billing Rate frequency of the contractor
You get four options:
Hourly
Daily
Monthly
Currency
Mandatory
Billing currency of the contractor
Base Pay
Mandatory
Base Pay Rate of the contractor
Country
Mandatory
Contractor's tax residency
COR Contractor Id
Optional
Unique identifier for a contractor
Designation
Mandatory
Job title of the contractor
Contract Start Date
Mandatory
Date of joining of the contractor in YYYY-MM-DD format
date_of_birth
Compensation
Currency
fix_salary.currency
Compensation
Base Salary
fix_salary.value
Compensation
Frequency
fix_salary_interval
Contact details
Personal Email id
emailNav.emailAddress
Contact details
Work Email id
Employment details
Employee ID
id
Employment details
Country
No field (requires custom field)
Employment details
Employment status
status
Employment details
Job title / Designation
position
Employment details
Start date, end date
hire_date, termination_date
Employment details
Employment type
employment_type


Learn how to integrate HiBob with Multiplier
Integrating HiBob with Multiplier enables easy data synchronization, eliminating manual data entry and ensuring accurate employee records. This integration allows HR teams to efficiently manage employee details, payroll processing, payslips, and leave tracking across both platforms.
To connect HiBob with Multiplier, you require:
Service User & Token: The Service User is created by the HiBob admin. Use an existing Service User or create a new one by following these steps:
a. Go to and log in to your HiBob account.
b. Select the Bento box (9-dots) from the upper left and go to System Settings
c. From the left sidebar, select Integrations and Search Service Users. In the Service users tile, select Manage.
d. Use an existing Service User & Token or create a new pair by selecting Create service user.
e. Copy and save the ID and Token. Select Done.
Permissions: Set by the HiBob Admin.
a. Select the Bento box (9-dots) from the upper left and go to System Settings.
b. From the left sidebar, select Account > Permission groups.
c. Select Create permission group > Service user.
d. Enter the Group name. Select Tags. Enter the Description and select the service user of your choice. Then select Create and select Confirm.
e. Once it’s created, the admin will land on a page where they can allow permissions for integrations and also set who to allow permissions for.
WHO - Select the People’s data tab. From the Access data for section, the admin can choose which employees to assign to the permission group. Go to Whose data can members access? And click on Select people by Condition and use the filters required. E.g., Site, Lifecycle, etc.
What - The admin must allow certain permissions depending on the requirements for using integration features. Go to the Features tab. Select the feature you want to allow permission and select the checkbox next to the feature. Once done, select Save.
After you have the prerequisites listed in the previous section, follow these steps to integrate HiBob with Multiplier successfully.
Before starting, ensure the following settings are correctly configured in HiBob:
Add the Sites: Ensure the Sites are correctly added in HiBob and match the Entity MSA.HiBob admin needs to step up the location.
a. Go to and log in to your HiBob account.
b. Select the Bento box (9-dots) from the upper left and go to System Settings
c. Select Company > Sites.
d. Select Add Site. Add the required details and select Next.
e. Add localization, calendar, and working pattern details. Then select Done.
2. Add Job Titles: Job titles must be added in HiBob to prevent sync errors (e.g., Engineer, QA, etc.).
a. Go to and login to your HiBob account.
b. Select the Bento box (9-dots) from the upper left and go to System Settings
c. From the left sidebar, select Data Management > People’s data fields
d. Select Done.
e. Enter job title in the Search bar and go to Job Title.
f. Select the ellipsis icon (three vertical dots) next to Job title and then select Edit.
g. In the Edit column dialog box, select Manage, and then select Add.
h. Add Job titles and select Save.
Log in to your Multiplier account.
From the left sidebar, select Settings > Integrations.
Select the App directory tab.
4. Select HiBob and then click on Connect.
5. Enter the Service User ID and Token. If you don’t have this information.
6. Select Submit to complete the integration, and then select Close.
Prerequisite: Ensure employees are activated on the Multiplier platform. If the employees are not activated, their profiles will not sync.
After completing the integration, go to Settings > Integrations.
Select the connection tab. Go to HiBob.
Enable the toggle next to EOR employees' data sync and select Continue.
4. Once enabled, all the EOR employees listed in the Multiplier platform will start syncing to HiBob.
Note - Wait for a few minutes after the syncing is done. You can find the synced employee profiles under the People tab in the HiBob platform.
After completing the integration, go to Settings > Integrations in the Multiplier platform
Select the connected tab. Go to HiBob.
Enable the toggle next to Global payroll employees’ data sync in Multiplier.
4. Select Confirm to Complete the setup. Employees with validated data will sync to Multiplier.
Note: The Global Payroll Data sync can only be enabled when at least one entity's information is fully mapped. To map multiple entities, the client must first get the entities created in Multiplier.
5. All the employees listed in the HiBob’s People tab start appearing in the Team section of the Multiplier platform. Navigate to Team from the left sidebar of the Multiplier platform.
Admins can create or use an existing payslip folder to sync the payslip.
Login to the HiBob dashboard. Navigate to Taskbar on the left > Docs. And select People’s docs.
2. Select an existing payslip folder or create a new one:
a. Select the existing Payslips folder - The Admin can select any folder from the list on the platform or create a new one here.
3. Once done. Go to Multiplier’s portal. From the left sidebar, select Settings > Integrations, select the designated folder.
4. Select the Plugins tab.
5. Select Enable next to Pay slips. When a payslip is published for an employee, this sync helps deliver it to HiBob.
Prerequisites: Ensure that the leave policies are created in HiBob.
Login to Multiplier’s portal.
From the left sidebar, select Settings > Company Settings > Company Policies > Time Off Policies.
3. Use the Leave Mapping UI in Multiplier to map HiBob leave types.
4. Enable Time Off Sync to import approved leave data from HiBob to Multiplier.
5. Employees' leave counts will be updated automatically.


